Post by Samantha on Dec 29, 2013 21:15:26 GMT -5
I am sooooo sorry this is so late. With the holidays and going back to work full-time this past week, I just didn't have as much time as I thought I would. Once again, I apologize! Enjoy 

In this tutorial I will take you through the method that I use of creating clothing from pictures.
Skill level:
You don't need any experience with creating CC or clothing to follow this tutorial; it will be much more in-depth than your typical photo-skinning tutorial, but I will try to explain everything that I'm doing so that beginners can follow along. However, it should be kept in mind that photo-skinning is time-consuming, tedious, and often times very frustrating (or at least to me it is). It takes a bit of practice to do well, and sometimes you'll put hours of work into a piece of clothing only to trash it in the end.
What you need for this tutorial:
• Body Shop & The Sims 2
• GIMP (or your preferred image-editing software, as long as it is capable of handling layers)
• Photoshop (not required but recommended for resizing photos)
• Screen-capture software (I use Fraps)
Normally I use Photoshop for all CC because it's higher-quality than GIMP. GIMP, I've found, distorts images when resizing. However, I prefer GIMP for photo-skinning because I find some of its features more friendly, and it's the image-editing software that I first learned on.
Part 1
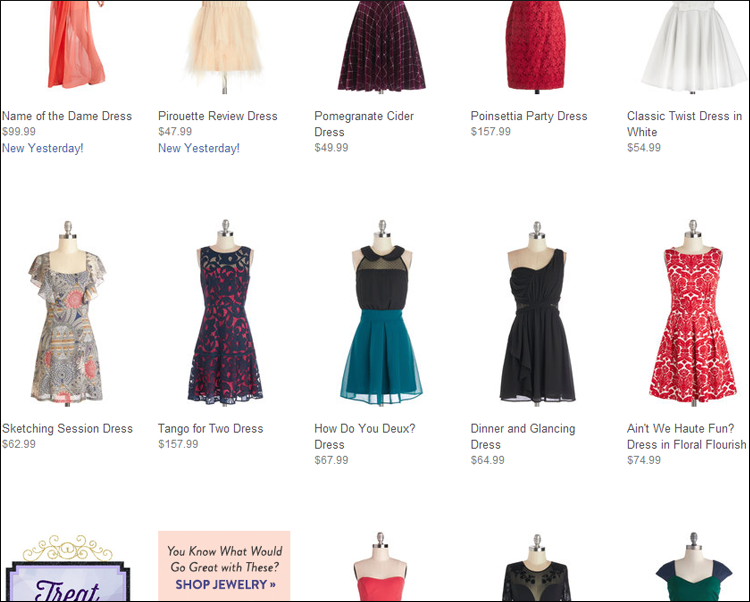
The first thing you'll need to do is find a picture of an outfit, front and back. Dresses are probably the easiest to skin; full outfits—with pants—are probably the hardest, because the proportions of the pants will never line up with the proportions of the mesh (the picture will always be too small, which requires stretching and/or copy-paste tiling). For simplicity's sake, we'll make a dress for this tutorial.
You want to use a clothing website that pictures both the front and the back of its clothing. It's easiest to skin an outfit that's not on a person. Mannequins are usually okay. You just want the outfit to be as flat, as straight-forward as possible. I'm going to be using ModCloth, which is one of my favorites.
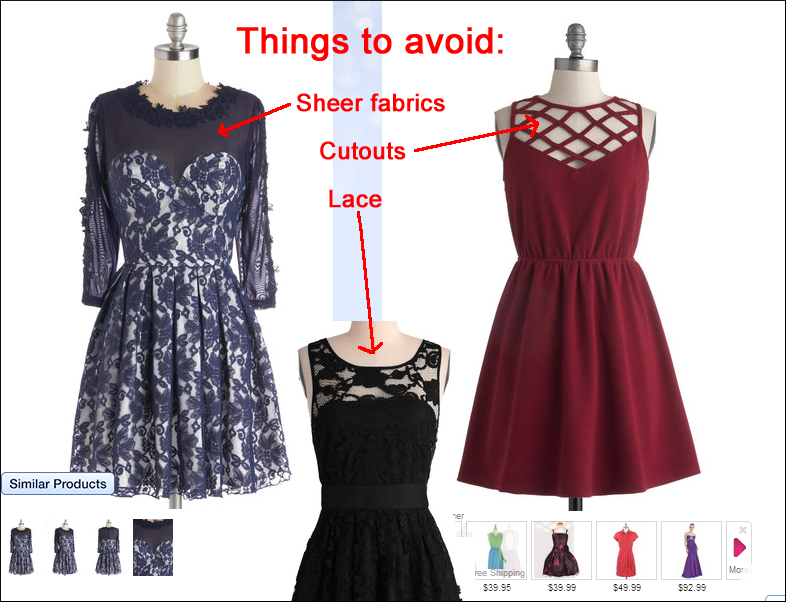
It's good to keep in mind what you can and cannot do with photo-skinning. You will never be able to create the outfit exactly as it as pictured—oftentimes I manipulate my outfit a lot just to get it to look right in-game; sometimes I cut off parts of a dress, or stick on fabrics from other outfits, etc., etc.
If you've never done this before, I'd suggest avoiding sheer or lacy patterns, as well as any patterns that require intricate cut-outs. The color white is sometimes hard to photo-skin, because it'll appear washed-out in-game. I like patterns and folds because they translate well; solid colors and smooth fabrics, on the other hands, can sometimes look flat and flood-filled.
Sleeves are also tricky to do sometimes. I never use the sleeves from the actual picture, but usually piece them together or color them by hand. If you're just starting out, I'd suggest going with an outfit that is sleeveless or strapless.
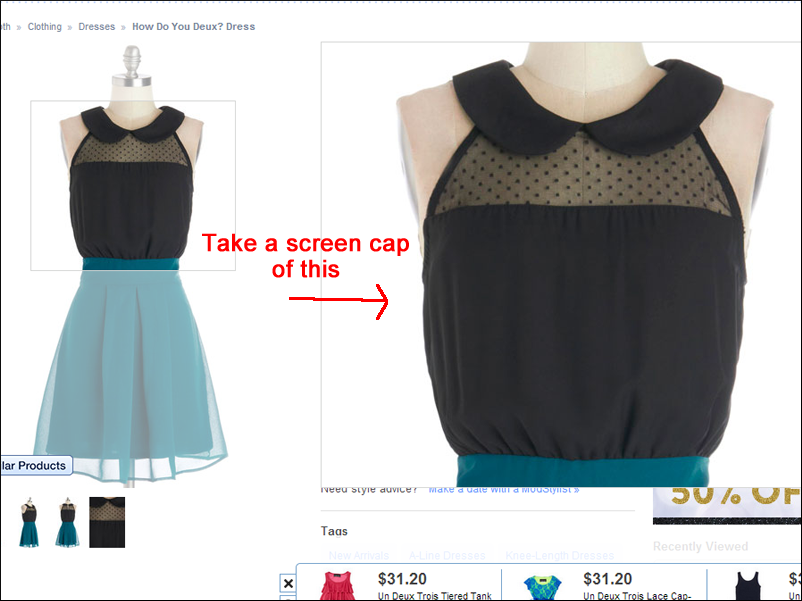
So I've selected this dress, and now I'll open up my screen-capture software (Fraps, in my case). I want the picture that I'm going to be skinning from to be as large as possible. So you know how clothing websites have a magnifying glass that lets you zoom in on the outfit? You want to take screen caps of these magnified sections of the dress—which, yes, will result in you having a bunch of disjointed sections of the dress, which we will piece together.
I've never found a website where the picture of the full dress (pictured above on the right) has been large enough. It's steps like these—like piecing together your picture—that I mean when I say that photo-skinning is tedious and time-consuming.
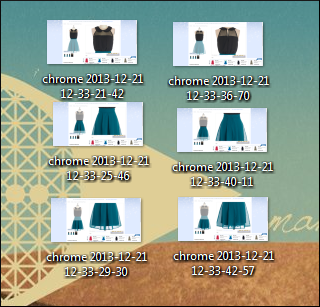
Take enough caps of both the front and the back of the dress that you know you have the whole thing—some overlap between the pictures is good. Usually I do three caps for the front, three for the back.
Next I'll open up Photoshop and paste the sections together.
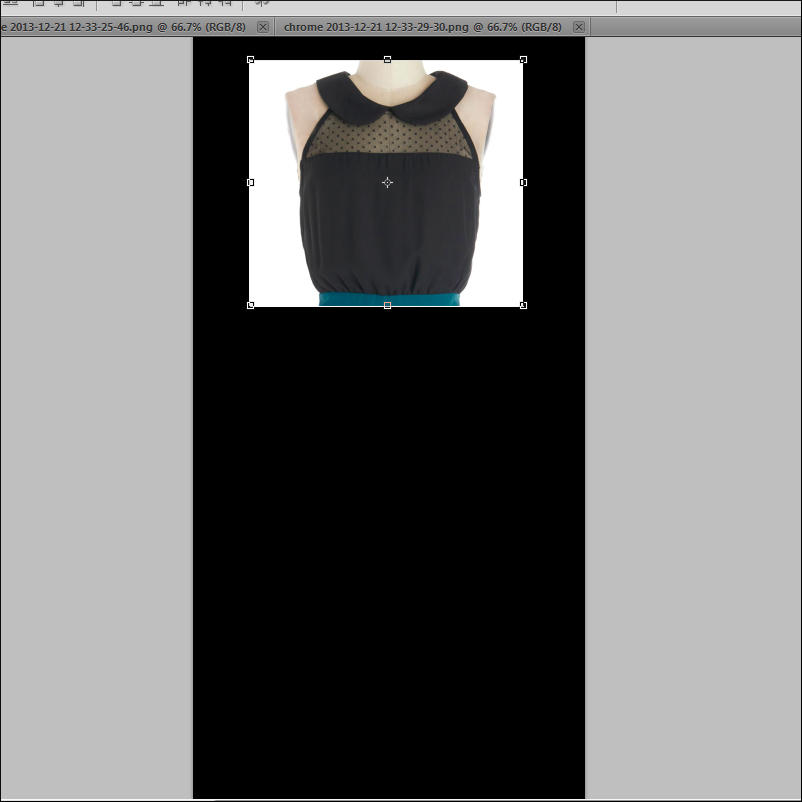
Open up the first screen cap of the front of the dress. Select the area of the top of the dress that we're going to be working with, cut it, then color the canvas a solid color (I've done black) and rotate the entire canvas 90 degrees. Now paste what we've cut at the top of the canvas.
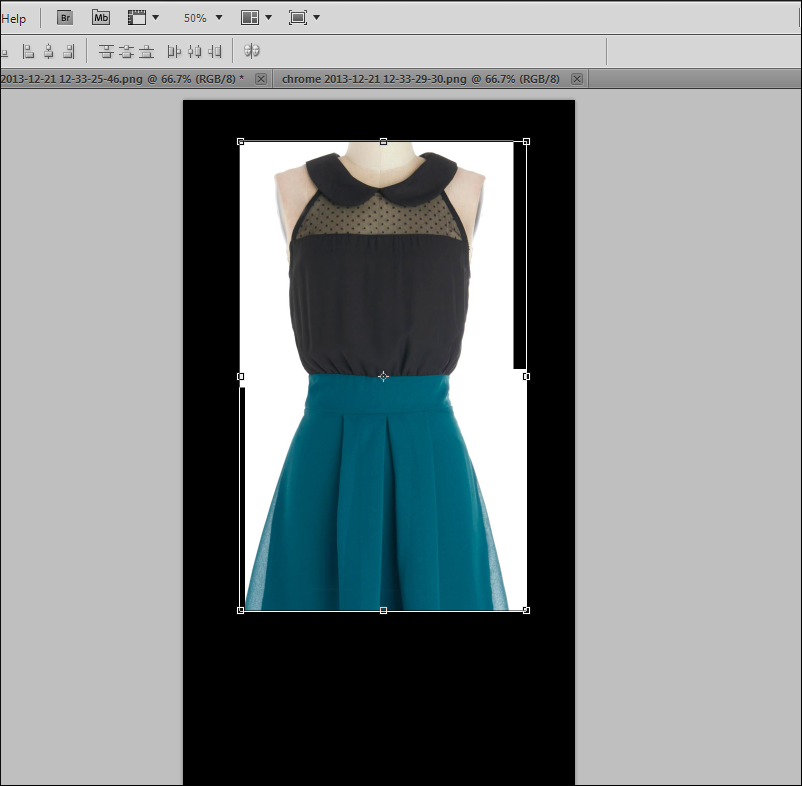
Open up the second screen cap of the front of the dress. Select the area of the midsection of the dress, cut it, and then paste it onto the other canvas with the top of the dress. Line up the two sections so that they meet perfectly. It's helpful to zoom in really close.
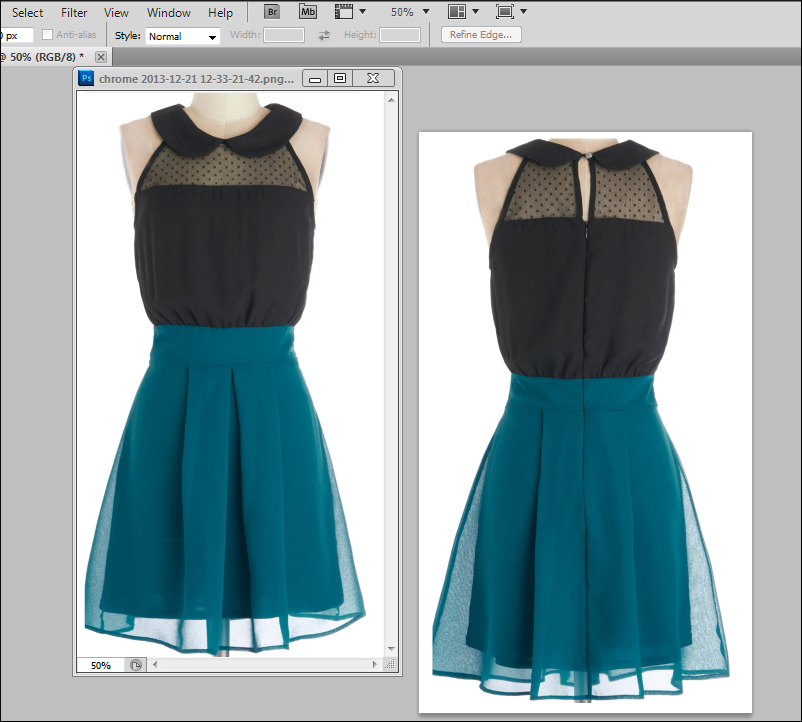
Repeat for the third section of the dress. Repeat for the back of the dress.
In the end you should have two photos: one of the front of the dress and one of the back, both of which are large enough to work with. You can crop them close and delete the rest of the screen caps.
Part 2
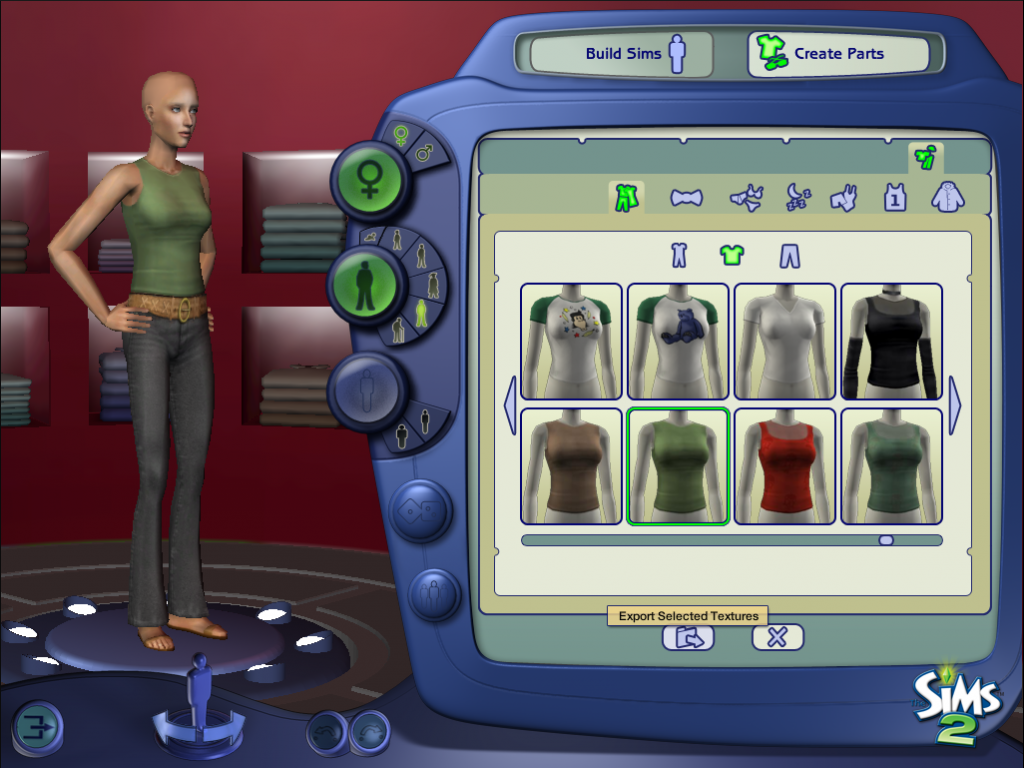
Now it's time to open up Body Shop. Once it loads, go to Create Parts>Start New Project >Create Clothing. We're going to look for a mesh now to put this photo on. I'm going to try to select one that is as close to the shape of the dress in the picture as possible.
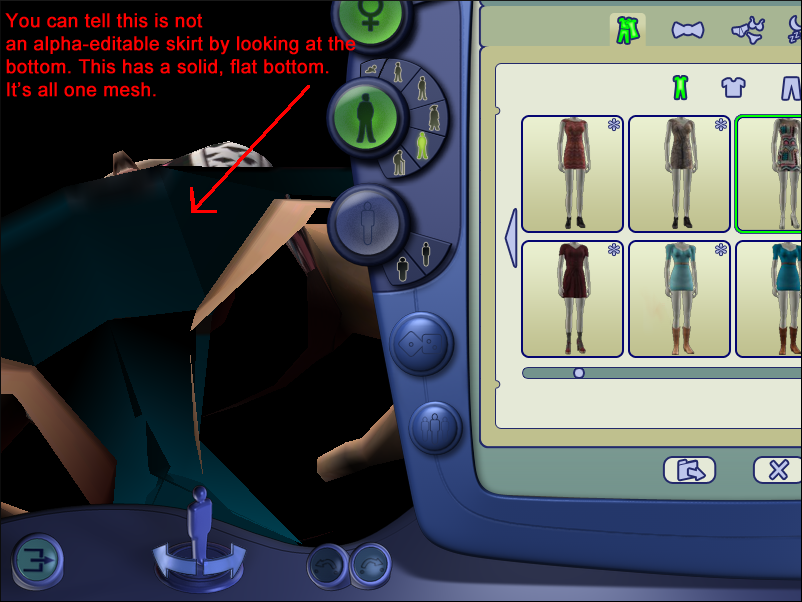
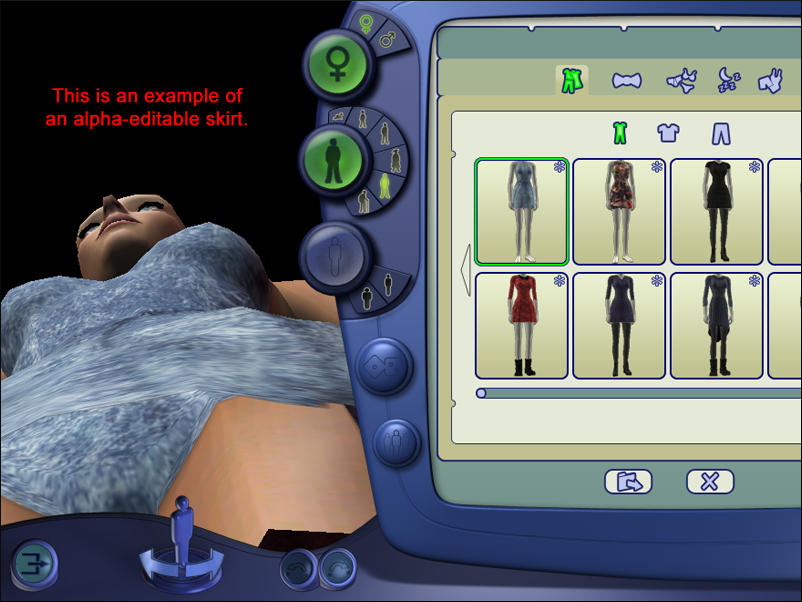
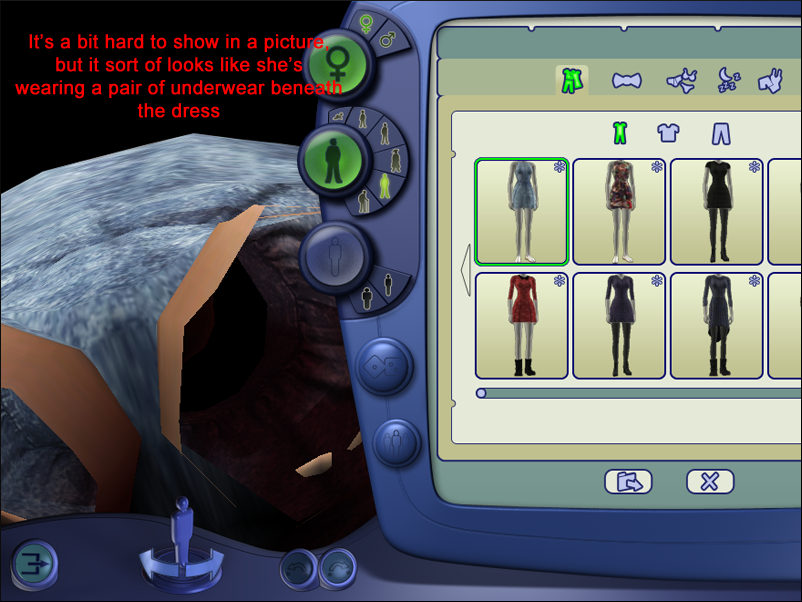
Try to avoid alpha-editable skirts, if you can. An alpha-editable skirt is basically an overlay that goes on a mesh, so that a skirt can be shorted or extended using an image-editing program, without having to alter the mesh itself. If you choose a mesh with an alpha-editable skirt (you'll know because, if you rotate the screen down in Body Shop, you'll see that the dress is open on the bottom, not solid; also when you open up your image-editing program, there will be a separate file for the skirt), you'll have to skin the outfit in two parts, rather than in one. And most of the time the two parts don't match up perfectly, so you'll have to play around with it a lot to get it to look right.
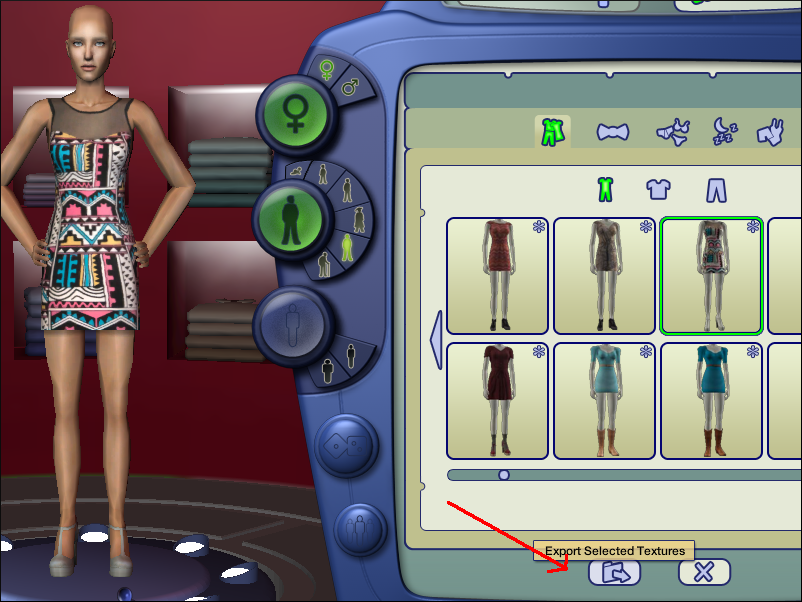
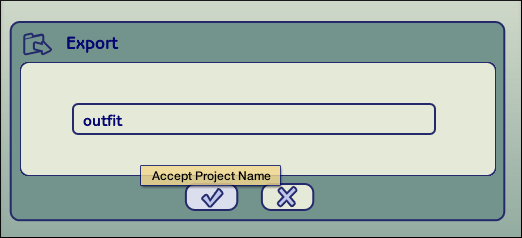
The shape of dress that I'm skinning for this tutorial is rather simple, so I'm going to go with a simple, short, body-hugging mesh. Click "Export Selected Textures," and then you'll be prompted to give your project a name. If you have a lot of projects in your projects folder (Documents >EA Games >The Sims 2>Projects), it's a good idea to give it a distinguishing name. My projects folder is empty, so I've simply named mine "outfit."
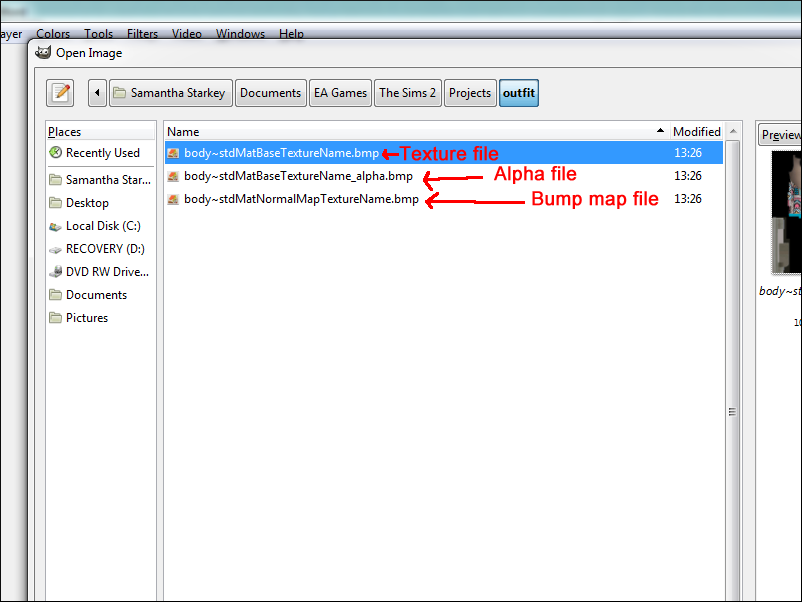
Once you've exported your project in Body Shop, you can now open up GIMP. File>Open your project by navigating to the aforementioned "Projects" folder (Documents>EA Games>The Sims 2>Projects) and clicking on the subfolder with your project name (e.g. "outfit").
Your project subfolder should have three files within it. Some meshes, like ones with alpha-editable skirts, will have more than three files. The files are always in the same order: texture, alpha, bump map. The texture file is the file that you will be putting the picture from ModCloth onto. The alpha is a black-and-white image that basically adds "cloth" to your design—that is, anything this is white is an area on the Body Shop mannequin that clothing will appear on. The bump map file is a grayscale file that adds a 3D imprint onto your outfit, to match the bumps and wrinkles of the dress. Depending on whether or not your graphics card supports bump maps, you may or may not be able to see bump maps (my old computer, for example, didn't have a graphics card which supported bump maps, so for the longest time, I thought this grayscale file was completely useless).
If you think that your graphics card can support bump maps, yet they aren't showing up in Body Shop or in-game, then there's a tutorial here on how to turn bump maps on:
simswiki.info/wiki.php?title=Game_Help:Bump_Maps_and_Shaders
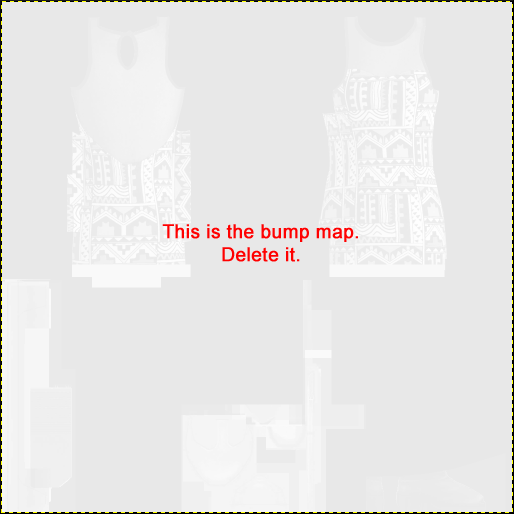
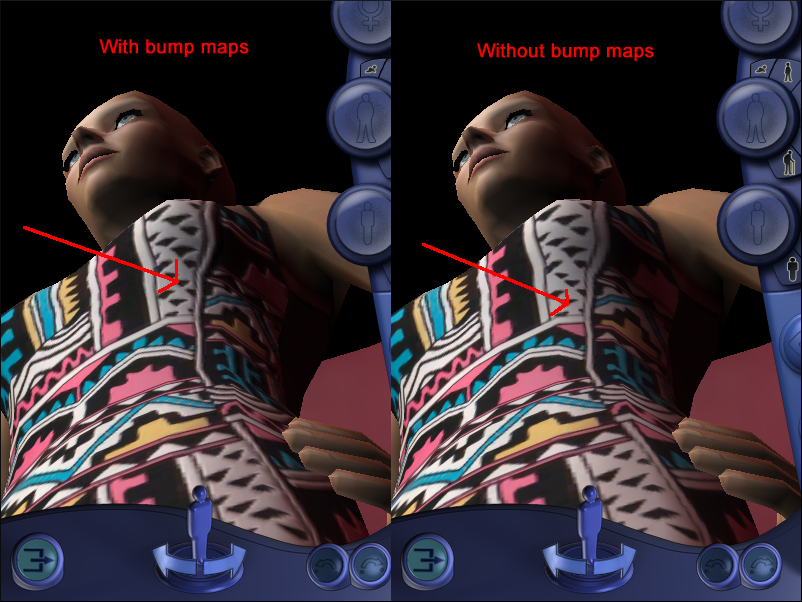
First and foremost, we're doing to do some prep work. Open up the bump map file (the third file, the grayscale one), and if there's an image there, delete it: make the entire canvas black. Save and close the file.
Then open up the alpha file (the second file, the black-and-white one) and make a copy of it. Close the file and open up the texture file (the first file). Now paste the copy of the alpha into the texture file and save.
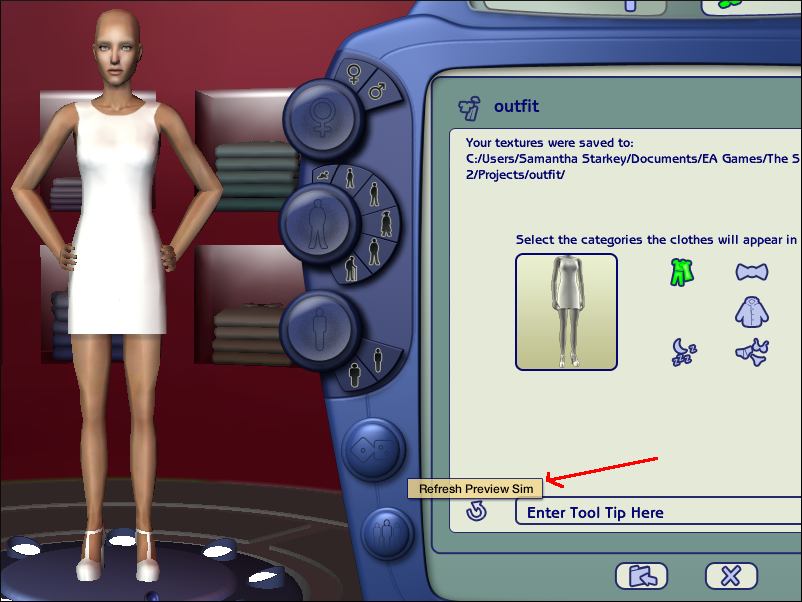
Go back into Body Shop and refresh. Your outfit should be completely white now, as picture above.
Part 3
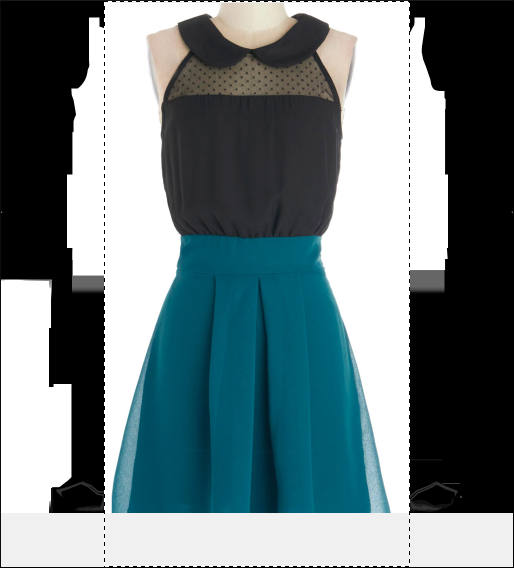
Now we'll actually begin photo-skinning. But when you paste the picture of the dress into the texture file as-is, you'll see that it's too big. So we're going to resize. With the texture file open in GIMP, open up the two pictures of the dress—the front and the back—in Photoshop.
It's always better to make a larger photo smaller than it is to make a smaller photo larger.
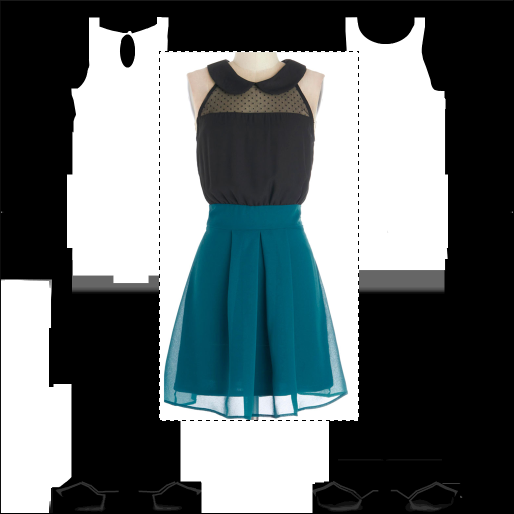
It takes a bit of guesswork to resize the dress perfectly. The dimensions of the front of the dress are currently 612 x 1132 px. I'll try setting the width at 400 (the height should automatically adjust proportionally, to 740 in this case), and copy the resized image from Photoshop to our canvas in GIMP.
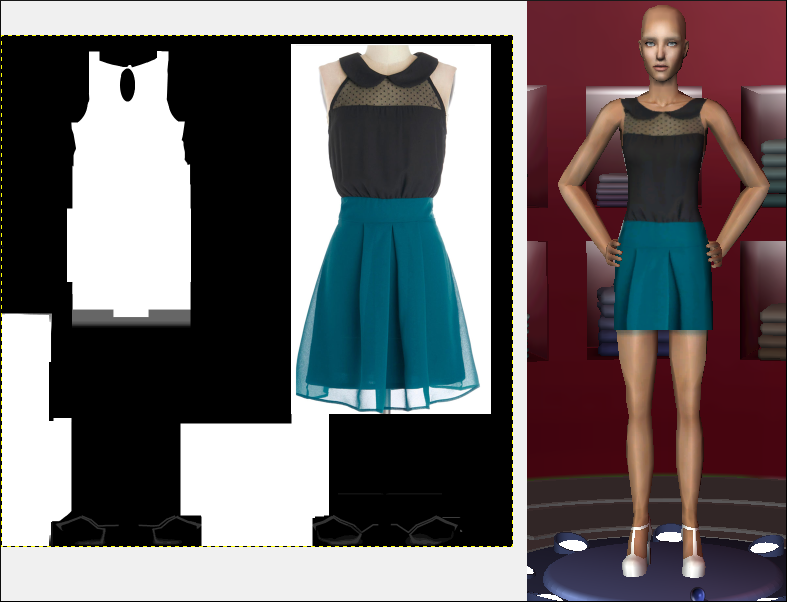
But 400 x 740 is still too big, as you can see when you align the dress on the canvas, save, and refresh in Body Shop.
A note for those of you who have never worked with clothing in Body Shop: the front of the dress is always on the right side of the canvas, while the back of the dress is on the left.
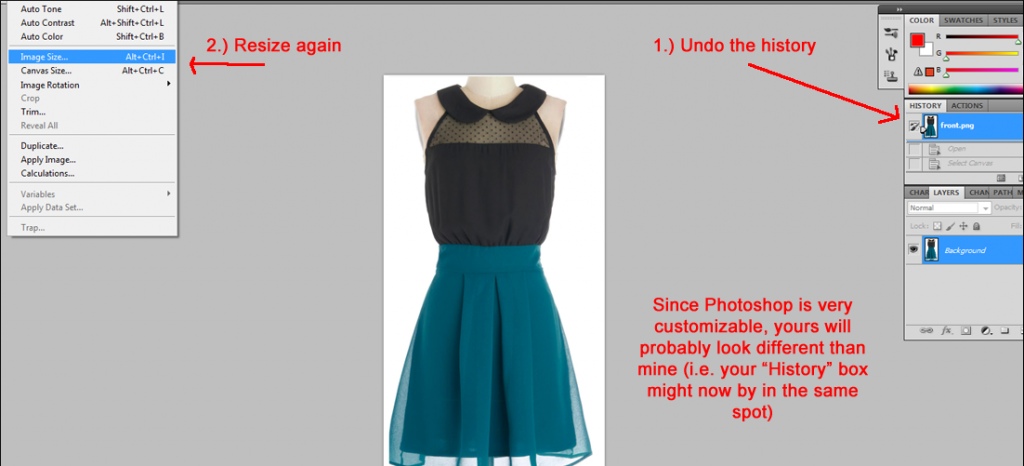
So back in Photoshop, I'm am going to undo all of the history (basically reset the image, so that we're not resizing what we've already resized, in case that causes distortion—this is very important to do if you don't have Photoshop and you're resizing in GIMP, because GIMP does distort images). Now I'm going to change the width to 325 px.
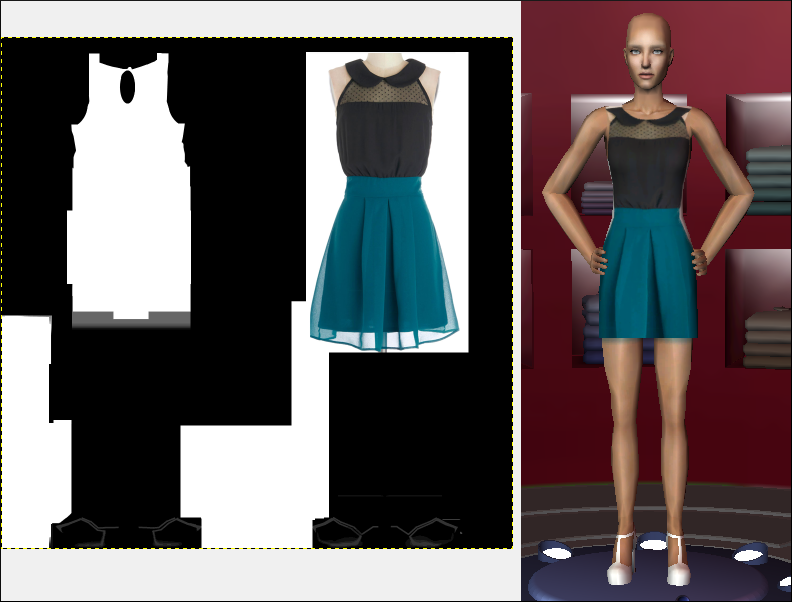
It looks pretty good.
So once you're done with all of the guesswork and you have your resized picture of the front of the dress, you now want to also resize the back of the dress. Since the original files were not exactly the same size (because I auto-cropped them), you can just eyeball it. I did 325 px for the front of the dress and 335 px for the back of the dress.
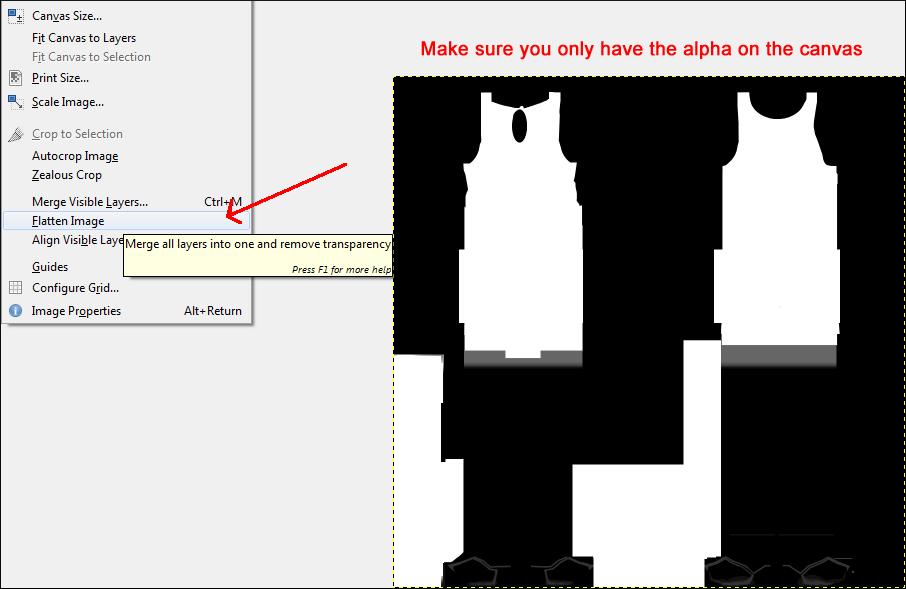
Back in GIMP, undo all of your changes until you are back to the black-and-white alpha only—that is, get rid of the image of the dress. Make sure everything is merged down so that you only have one layer (Image > Flatten Image).
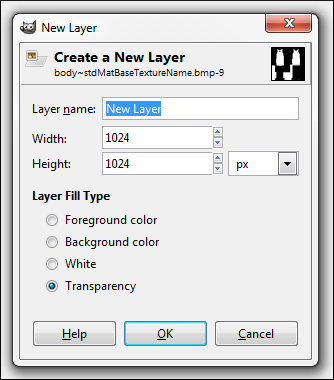
Now add a layer to the canvas (Layer > New Layer). By default, the settings for a new layer should be as shown above.
Press "OK."
You should now have two layers on your canvas. It is important now not to close this project, because GIMP cannot save layers. If you close your project, it will all be saved as one merged layer.
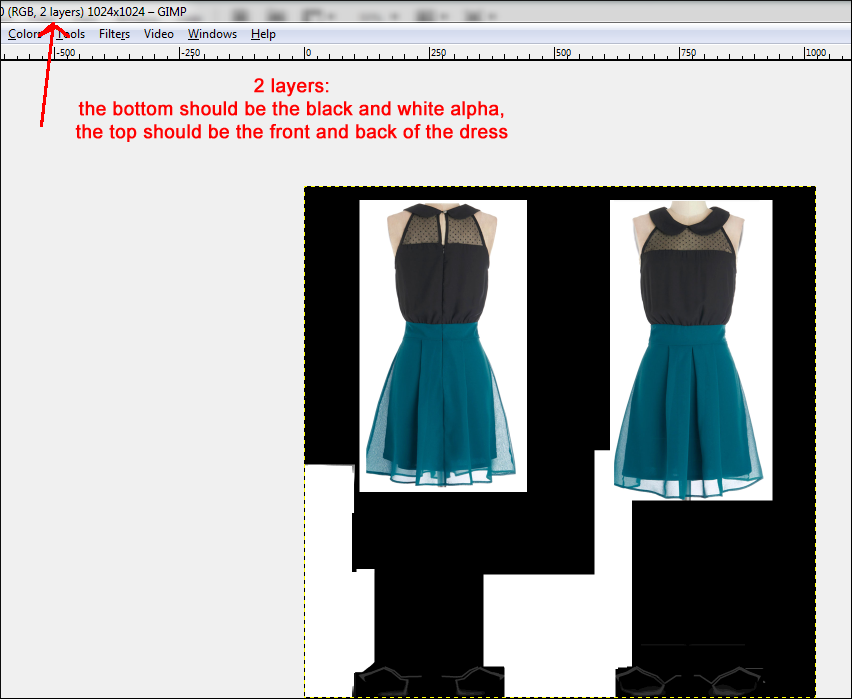
Now take your resized images from Photoshop and paste them into GIMP, aligning them with the generally anatomy of the alpha. You don't have to worry about getting them exactly aligned right now.
You can also close Photoshop at this point. IMPORTANT: Do not saved the resized pictures of the dress. Undo all of the history for each of the images and save them as their original, larger size. This way, if we mess up or need to use a larger picture somewhere down the line, we don't have to pull them from the website again.
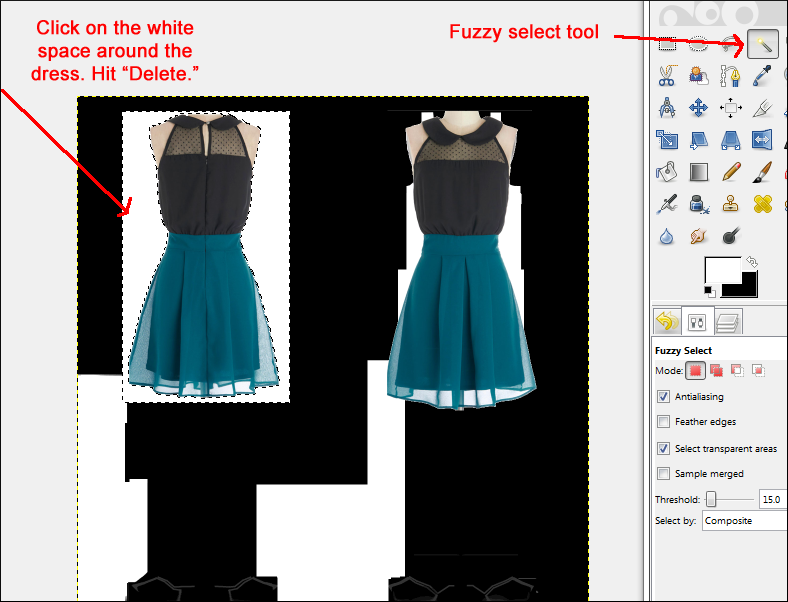
Now, in GIMP, click on the Fuzzy Select Tool and then click on the white space around the front of the dress. Hit delete, making sure first that none of the actual dress is caught in the wand. Do the same for the back of the dress.
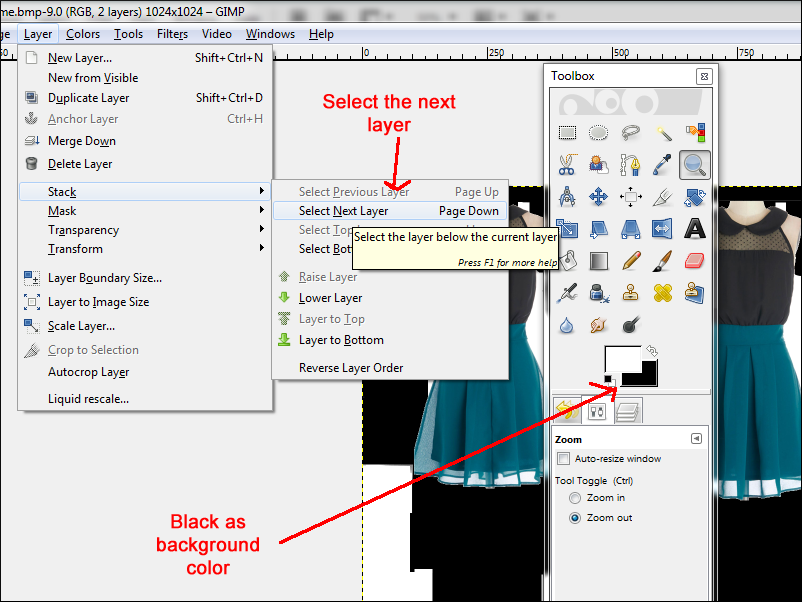
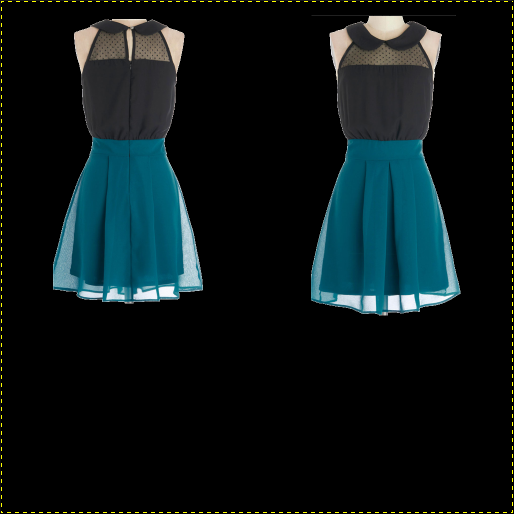
Next, go to Layer>Stack>Select Next Layer, and with black as your background color, hit delete. This will get rid of the bottom layer so that only the dress remains. We needed the white alpha only to align the dress to the canvas in the general area.
Go back to the top layer by going to Layer>Stack>Select Previous Layer.
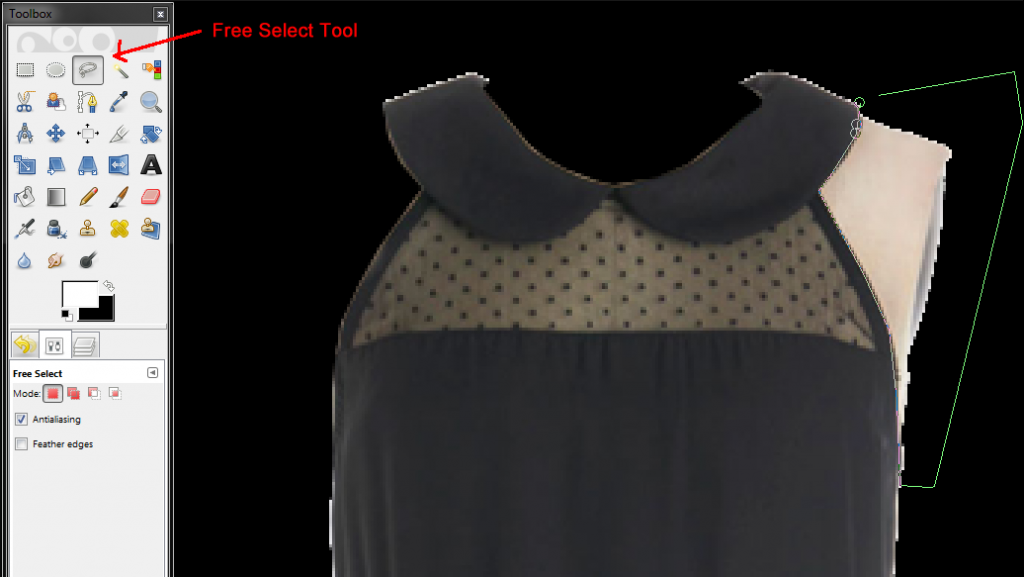
Next, using the Free Select Tool, zoom in really close to the dress and begin to cut away at extraneous parts of the photograph—the mannequin, for example. We want to clean up the photo so that only the dress is remaining.
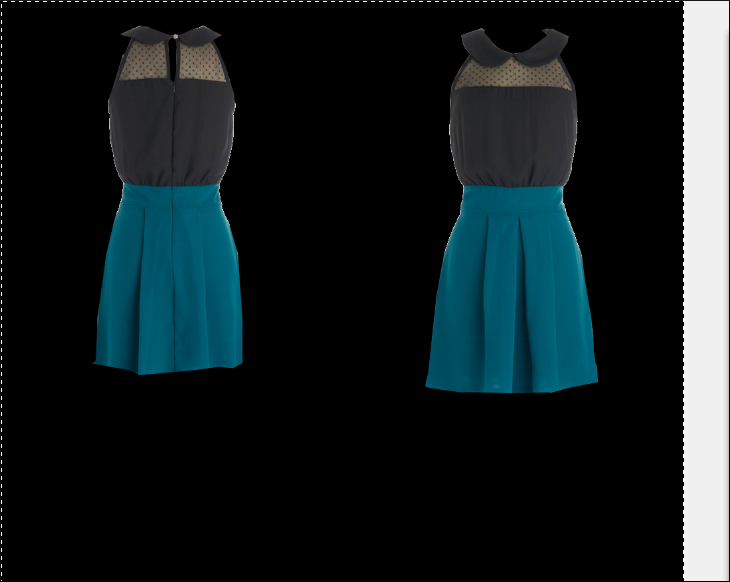
Clean it up the best you can. As you can see, I also cut away some of the sheer fabric from the skirt of the dress.
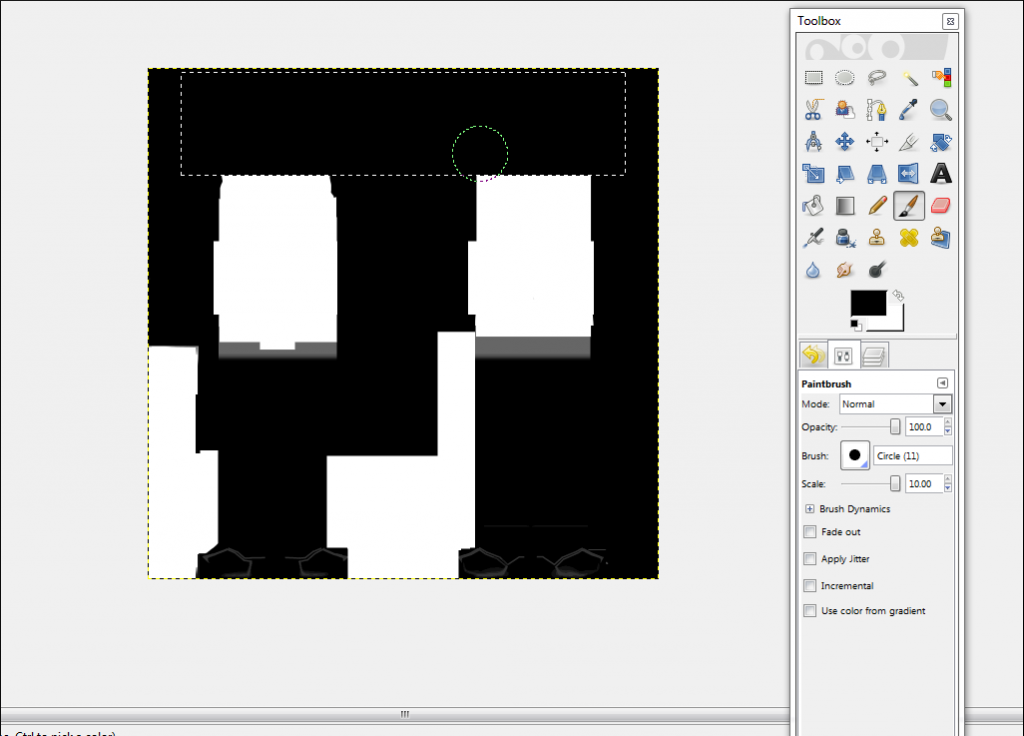
Part 4
Now make a copy of the layer. Without closing this file (I repeat: do NOT close it), go to File>Open, and open up the alpha file (the black-and-white one). Select the very top of the dress and delete it.
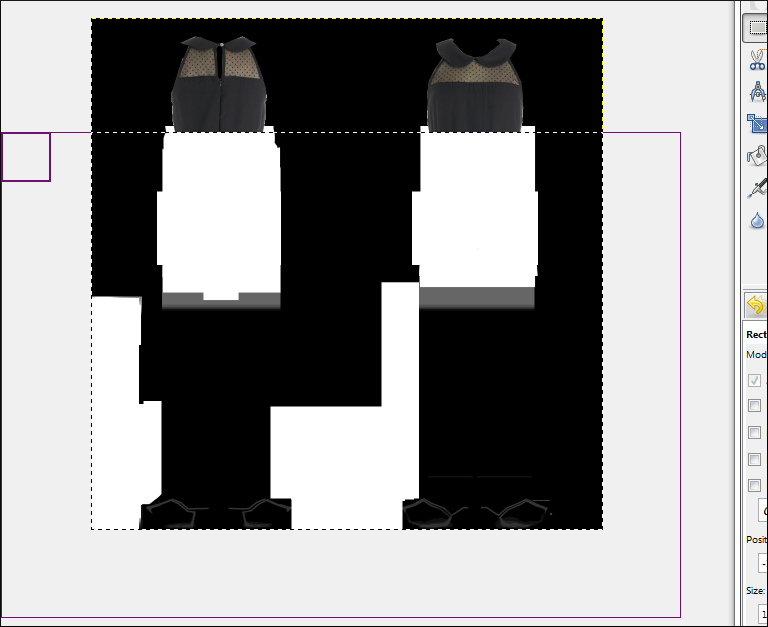
You should only have one layer on your canvas at this point. Add another one by going to Layer>New Layer. Now paste the texture on top of the alpha.
Select the bottom of the dress—up until just under what you deleted of the black and white—and hit delete. The top of your dress should now be textured and the bottom should be white.
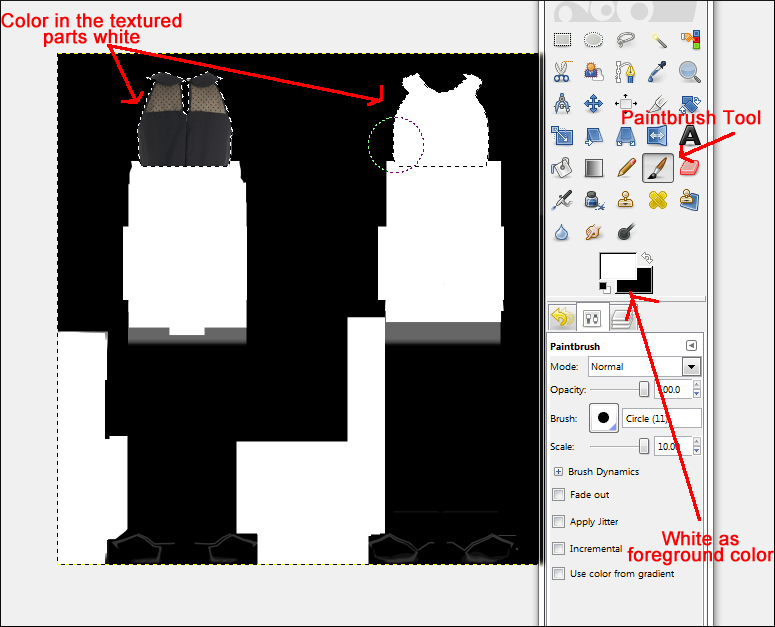
Do a Ctrl + A (to select the layer), a Ctrl + X (to cut it), and a Ctrl + V (to paste it). This will select just the very top layer, the textured part. Now click on the paintbrush tool, and with the foreground color set to white, color in the textured parts. By selected the layers, you won't be able to color outside of the dotted lines.
Flatten the image (Layer>Flatten Image) and save.
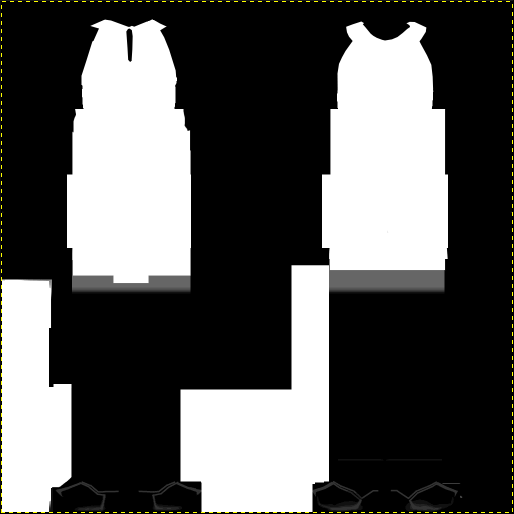
Congratulations! You've just made a custom alpha.
But don't get too comfortable, because this is hardly the final product. This is just a temporary one to gauge how well we've lined up the texture with the actual mesh. Remember how I said photo-skinning is tedious? We'll probably do this a couple of times over.
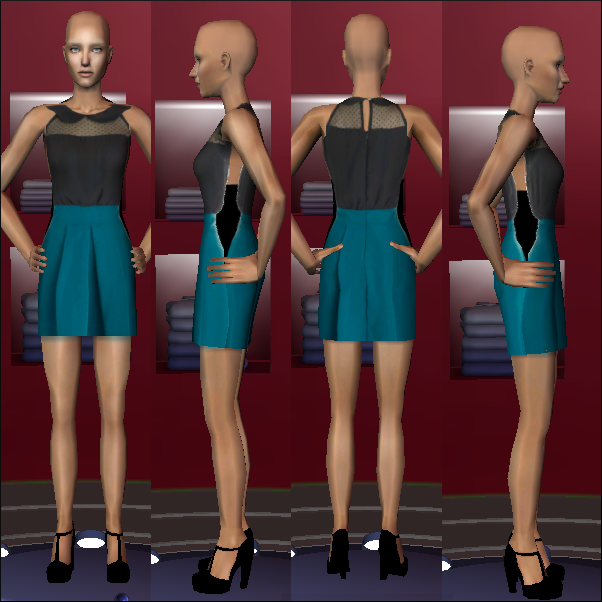
Part 5
Save both the texture and the alpha file, then refresh in Body Shop. NOTE: Now that we're working with layers, you might get a notice in GIMP when you save asking about exporting the file because the program can't handle layers. "Merge Visible Layers" will be checked by default. Hit "Export." This doesn't really matter as long as you don't close the image and lose all of your history.
Study the outfit in Body Shop. Now is the time to examine the alignment of the texture on the mesh, and whether or not the texture should be moved up, down, left, or right—maybe even resized a little.
You'll notice that the dress does not meet at the sides, and that there's a lot of black space. That's fine for now. If your dress does meet, you probably didn't resize the original images to be small enough, and the dress' proportions will be slightly off (the torso, for example, will probably be too long). Never have I skinned a dress in which the sides have met perfectly without the need for manipulation.
Well, studying this dress now in Body Shop, it looks to me like it could be shifted upwards a bit.
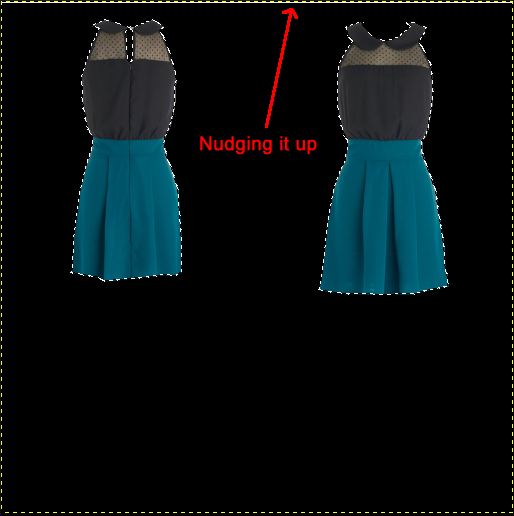
So back in GIMP, I'm going to do another Ctrl + A, Ctrl + X, Ctrl + V, and then with the "Rectangle Select Tool" selected, I'm going to use the arrows on the keyboard to nudge the dress up a little. I'm going to click the up arrow four times.
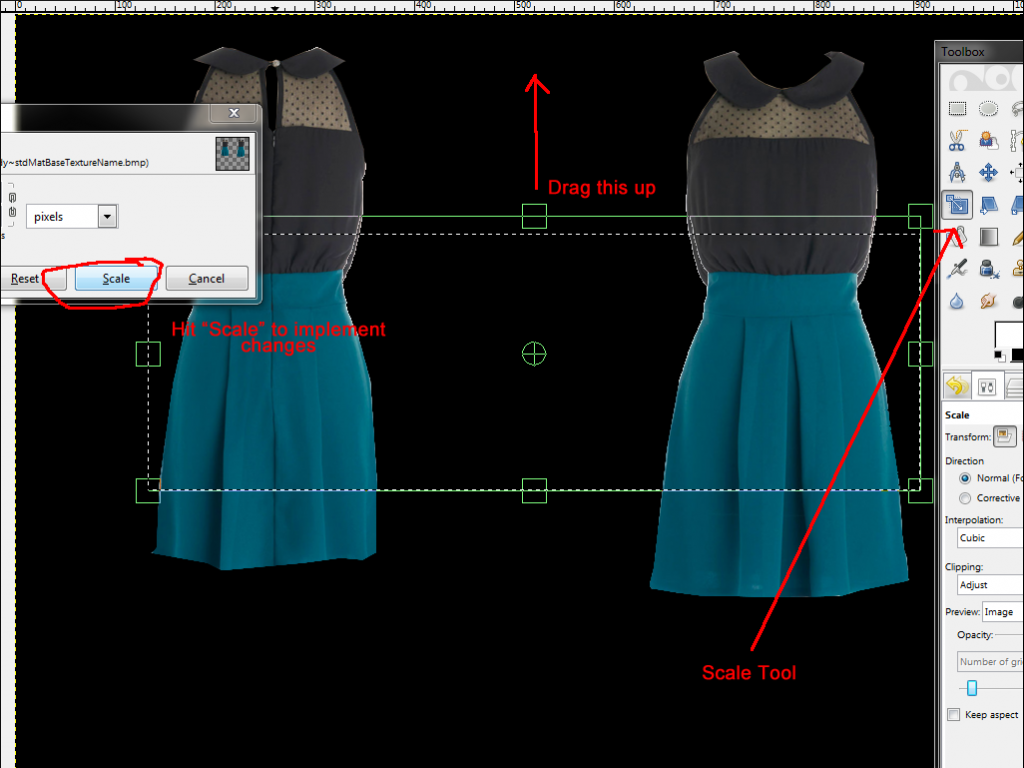
And also, because I'd like the skirt a little longer and the torso a bit shorter, I'm going to do some resizing.
I'm going to select a portion of the dress, starting somewhere around the middle of the bust and stopping at a pretty solid-looking area of the skirt. Now I'm going to copy and paste this section once, and then click on the Scale Tool, and then drag the top upwards a bit.
Once you are happy with the proportions of the dress and the way that it is sitting on the mesh, you should redo the alpha again by following Part 4. Don't skip this step.
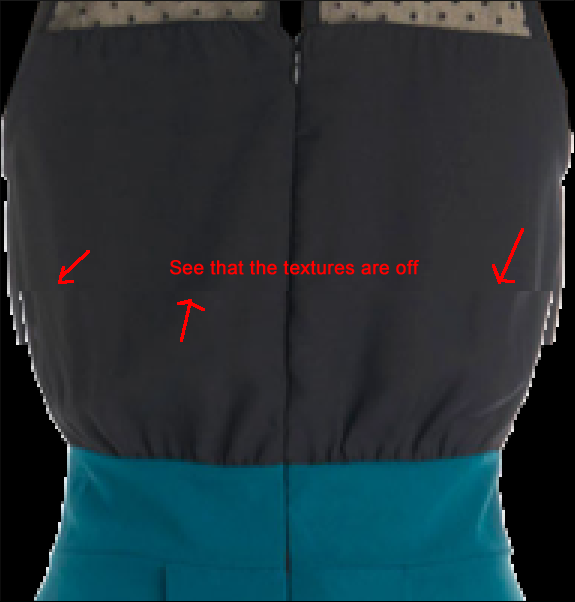
Because of the resizing/scaling I did in the last step, you'll notice that—when I zoom in—some of the textures don't line up.
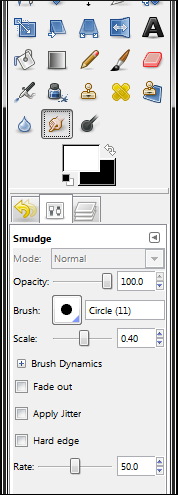
Using the Smudge Tool (which you can see I've set to a scale of .40), I'm going to carefully blend the textures together so that they look seamless. Do this for both the front and the back of the dress, wherever the textures are unaligned.
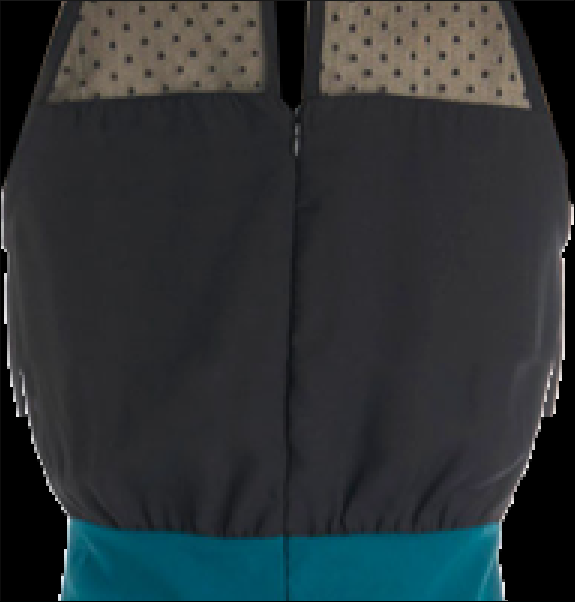
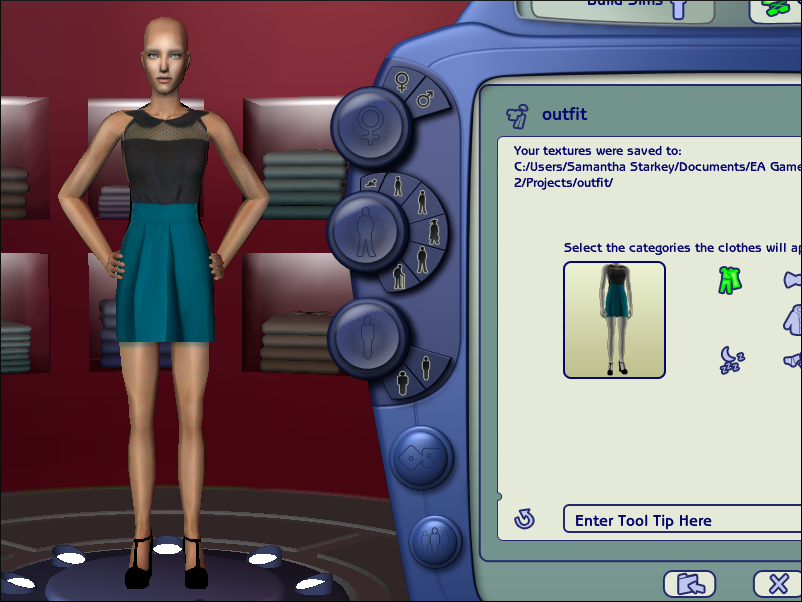
Looks pretty good.
Don't forget to do the front of the dress!
Part 5 1/2 - A Step I Accidentally Forgot About
I should have mentioned this much sooner:
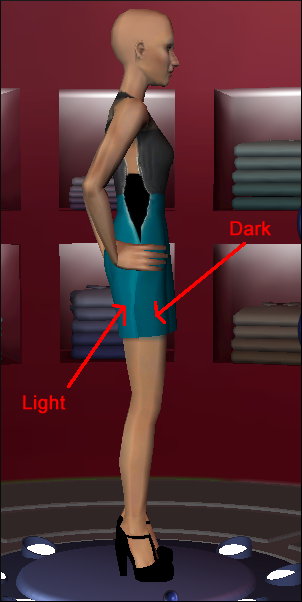
Some websites, ModCloth included, side-light their clothing. So a light is placed on the right side of the outfit, making the right-hand side of the fabric brighter and the left-hand side slightly darker. But when you match the front of the dress up with the back of the dress in Body Shop, the opposite-lighted ends meet.
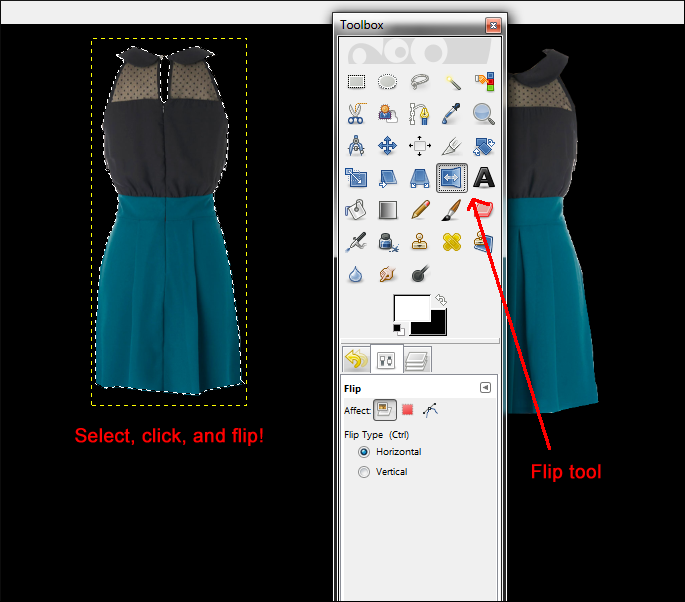
There's a very simple fix for this:
Using the Rectangle Select Tool, select the entirety of the back of the dress—as close to the edges as possible—then click on the Flip Tool (make sure it's checked to "horizontal") and click on the canvas to flip the section.
Save and refresh in Body Shop. Make any adjustments or movements needed to realign the back of the dress and then, unfortunately, you're going to have to redo the alpha again (Sorry! I meant to mention this earlier but forgot to do so—flipping the back of the dress is something that you can do as soon as you copy the image from Photoshop into GIMP).
Part 6
So now we need to make the sides of the dress meet.
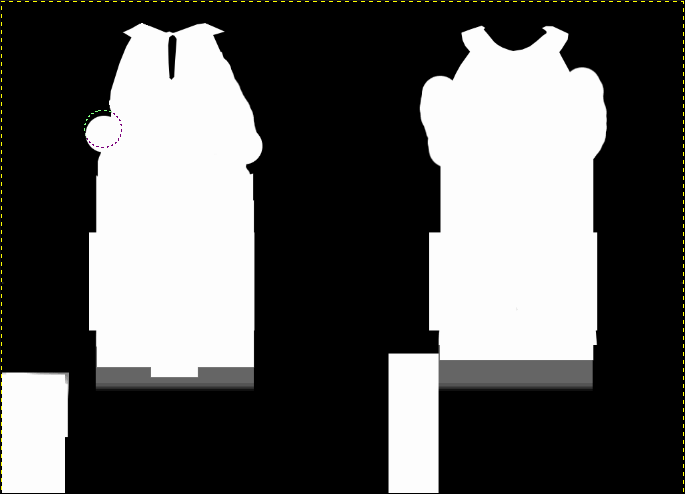
Before starting, switch over to the alpha and fill out the sides of the top of the dress with white, to ensure that the area is covering with "cloth." Don't worry about making it neat; we'll fix it up later.
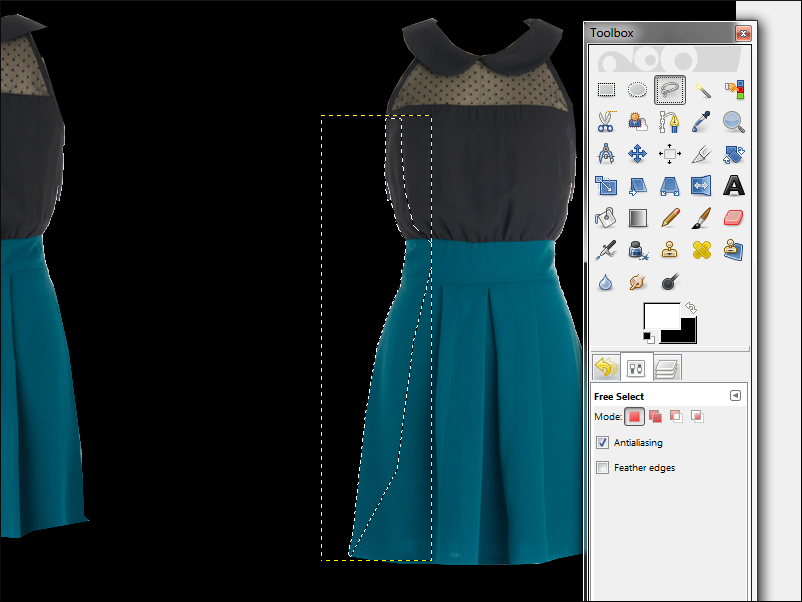
Using the Free Select Tool, start on the left side of the front of the dress and draw a selection starting from the armpit down to the skirt. Try to go through solid areas rather than cutting across any wrinkles or patterns. Connect your selection, then copy and paste it once.
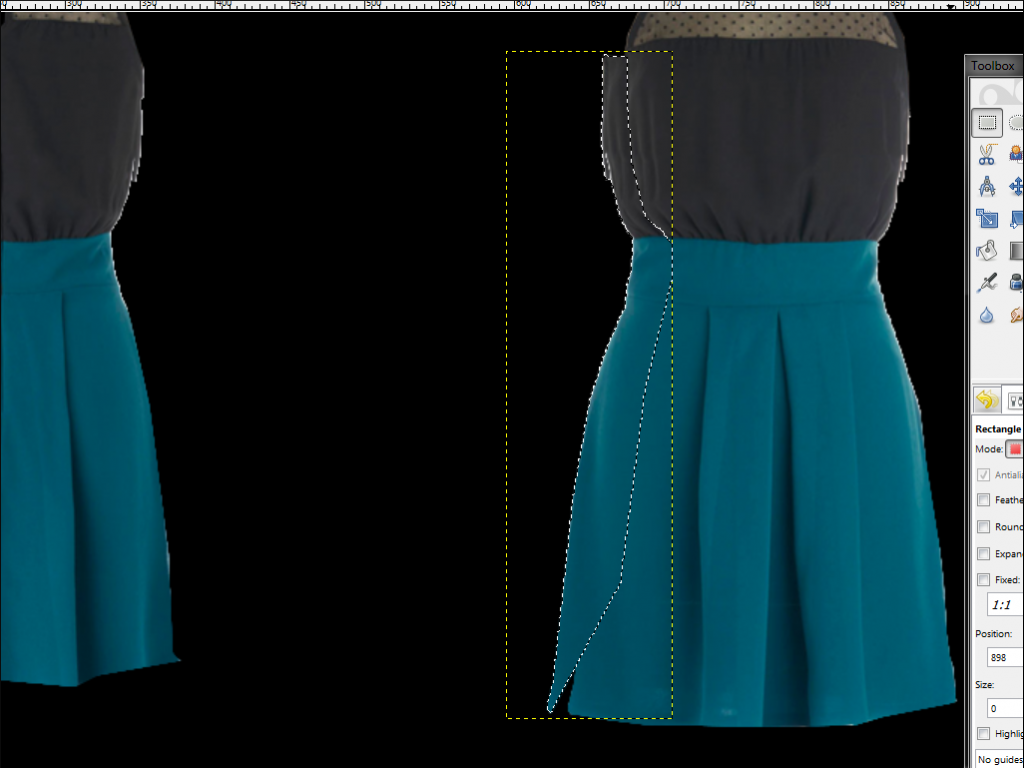
Move the copy to the left, thereby extending the side of the dress. Try to match it up as perfectly as possible. It will, of course, be a little off, but we'll fix that up later. Save and switch over to Body Shop to check your work.
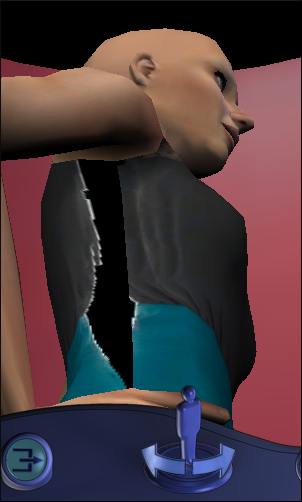
As you can see, the dress is almost but not quite all the way to the edge. The only parts that need to be extended a bit more are those right at the smallest part of the waist and right up beneath the armpit.
(If you still had a lot of ways to go, you could either do another copy and paste, or you could use the Scale Tool and stretch out the previous copy. Remember to treat any scaling or resizing that you do very delicately—you don't want to scale anything too large for fear of pixilating the textures.)
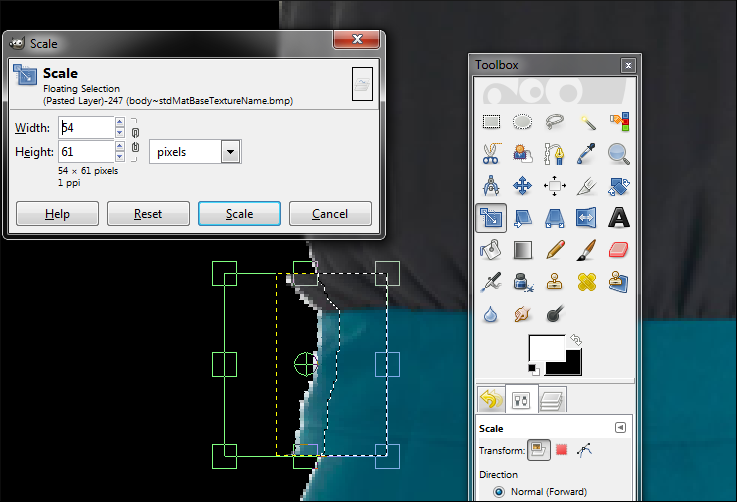
I'm going to use the Scale Tool for the waist, and I'll just do a little patchwork by hand for the armpit (because the area's so small).
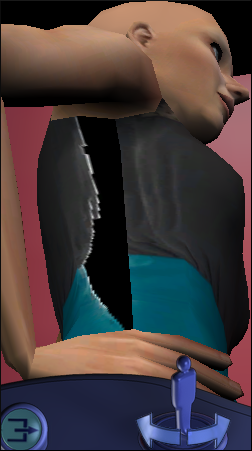
Perfect!
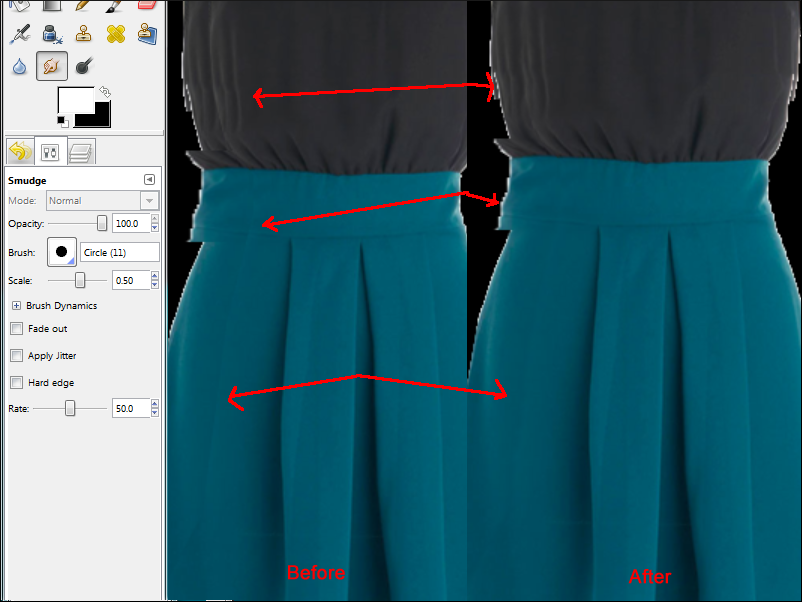
Now, using the Smudge Tool, I'm going to blend together the areas where I pasted the sections over each other.
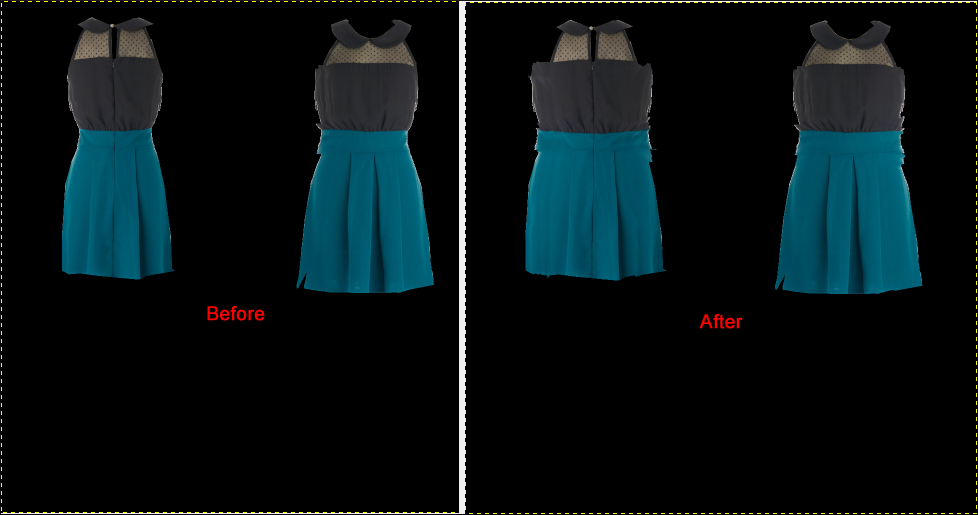
Once you're happy with the blending, repeat this process for the other three sides of the dress, so that all of the edges meet at the waist. It's helpful to save and refresh in Body Shop often. You'll do a lot of smudging and blending, and probably even some manipulation of the textures—for example, in order to get the sash on the back of the dress to match up with the sash on the front of the dress, I rotated parts of the texture and, at one point, even moved the entire top of the back of the dress up a few pixels (which, of course, required that I redo the alpha).
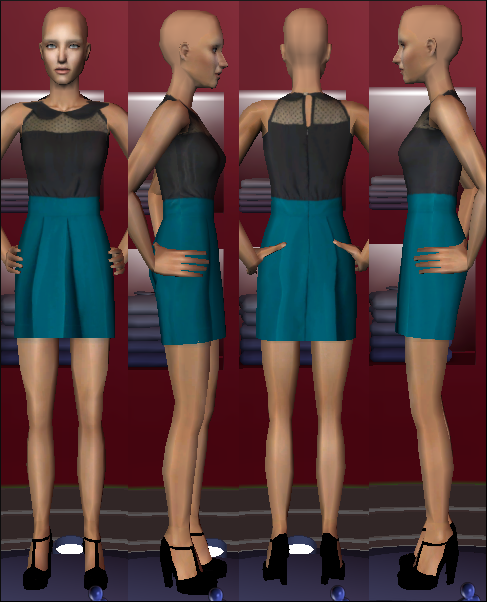
Here's how it looks in Body Shop.
It's looking close to done, but there's still a lot that we have to do. For example—
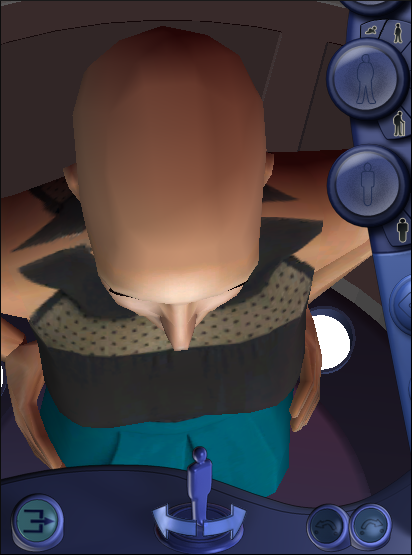
Part 7
The top of the dress still doesn't meet.
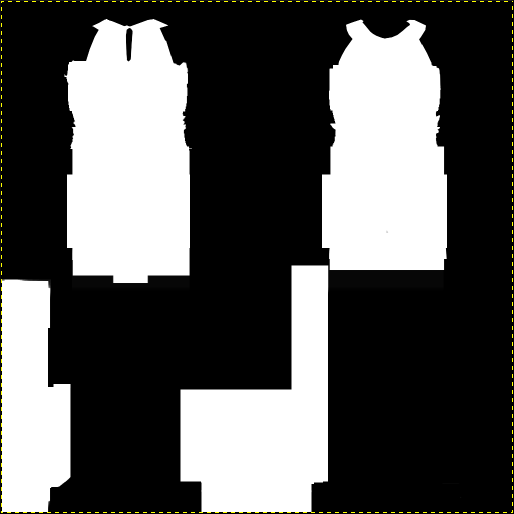
We're going to work with the alpha again, but because it is still pretty messy from the beginning of Part 6, I'm going to use my texture file to make a new alpha (Part 4). The sides of the dress won't meet when you do this, but that's okay for now. We're going to fix the straps of the dress and clean up the sides.
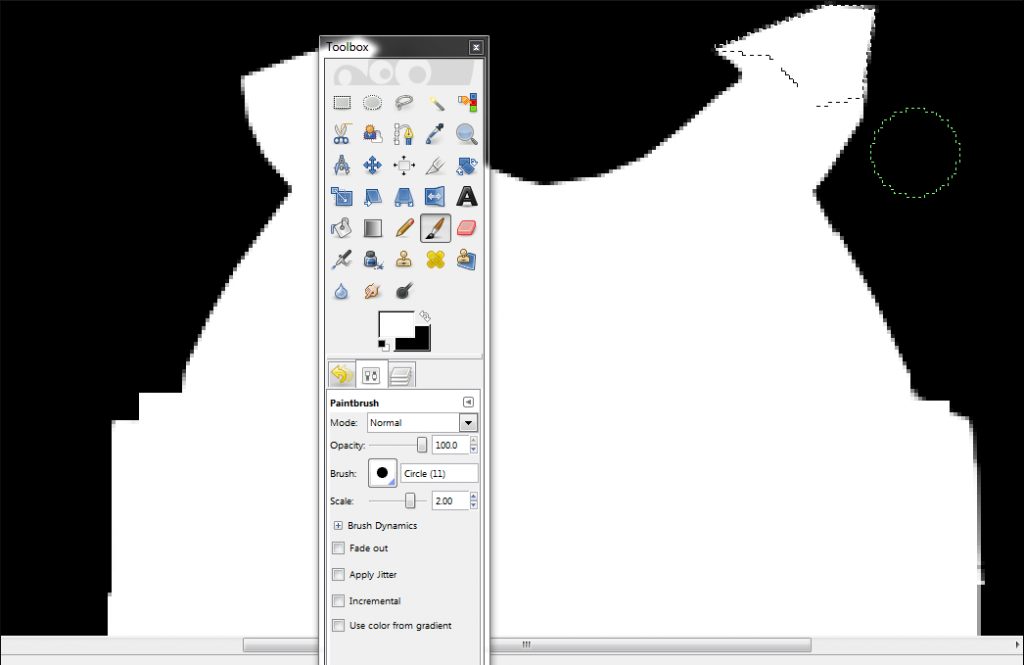
We have to extend the straps, because they're too short right now. Using the Free Select Tool, extend the strap on the front of the dress upwards. There's no hard-and-fast way of going about this; depending on the thickness and the direction of the strap, you'll have to play around, refreshing often in Body Shop.
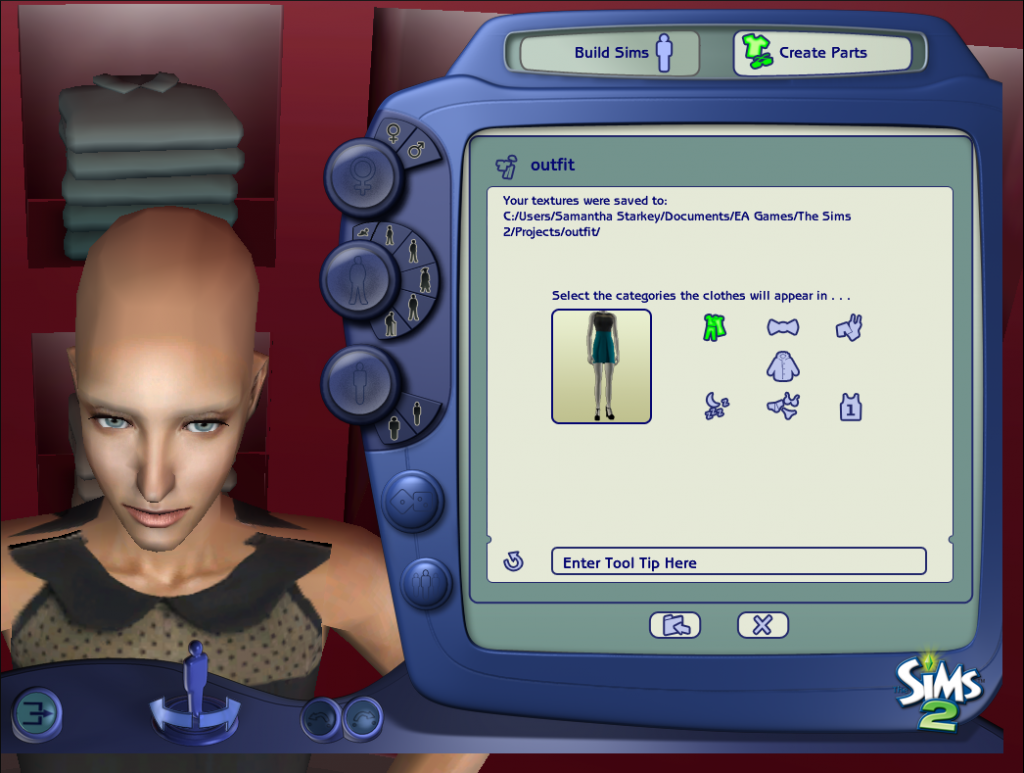
It should look something like this in Body Shop. The solid black is the "cloth" that you just added in the alpha file.
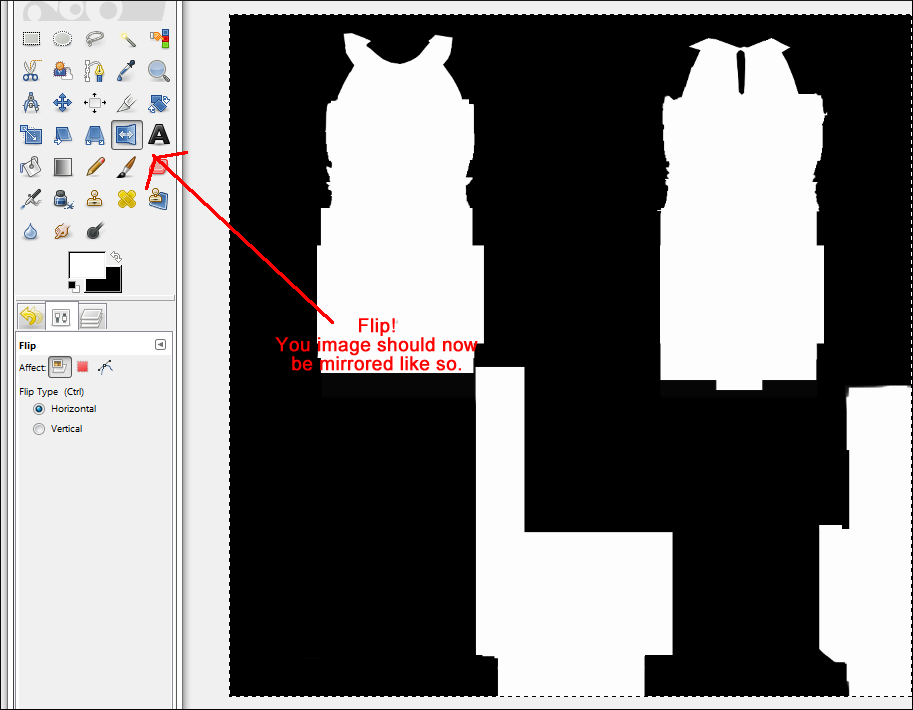
Now make a copy of the entire alpha. Add a new layer, and paste it. Then use the Flip Tool and horizontally flip your new layer.
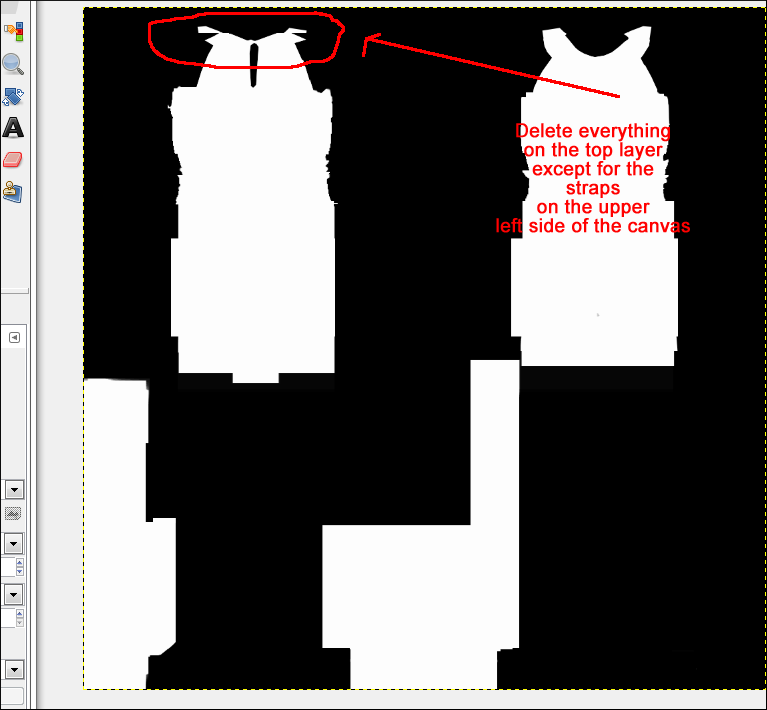
Now delete everything on your new layer except for the straps of the dress in the upper left-hand corner of the canvas. What we're doing now is trying to match the straps on the back of the dress with the straps on the front of the dress, so they connect perfectly. By mirroring the front of the dress onto the back of the dress, we can take some of the guesswork out of this endeavor.
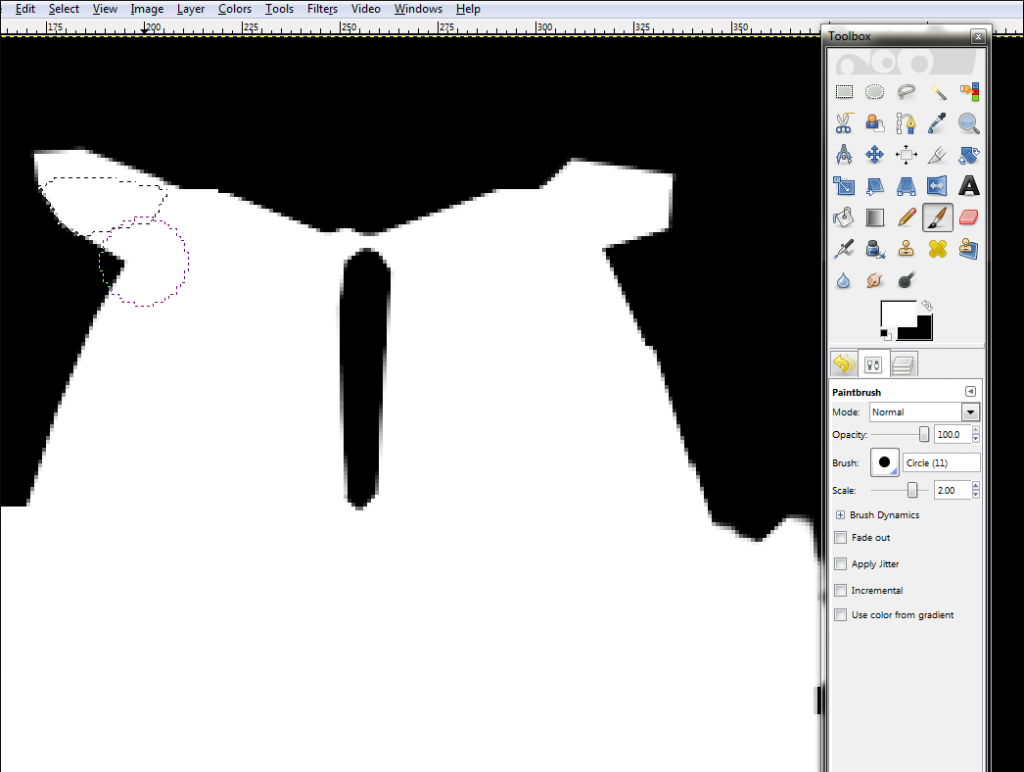
Connect the two sets of straps.
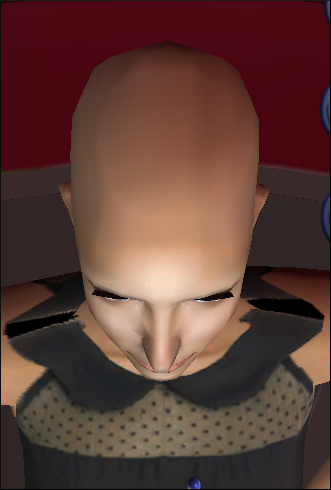
Save and refresh in Body Shop.
You can see that straps now connect, but that they might be a bit imperfect or slightly off in spots. Continue to play around with the alpha a bit. Get it to match as close as possible—until you're happy—and then switch back to the texture file.
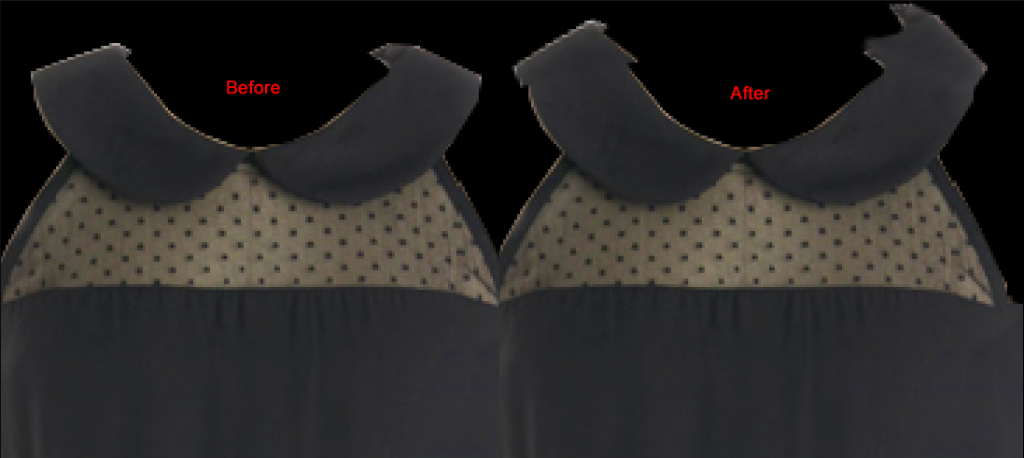
Extend the straps of the front of the dress by using the copy-and-paste method like we used for the sides. I also rotated mine slightly, and then used the Smudge Tool to blend the textures together.
Repeat for the back of the dress.
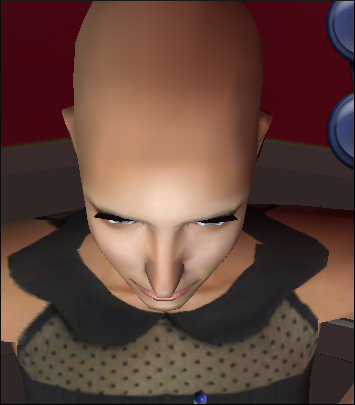
Here's how it looks in Body Shop.
The alpha is still slightly off, so I'm going to tweak it once more, and...
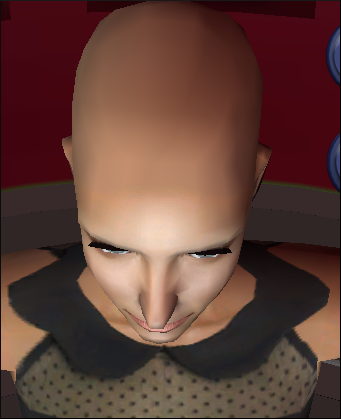
There we go!
Now we're going to work on the sides of the dress. For this, I usually cheat a little.
Part 8
For the sides of my dress, I usually steal an alpha off of a Maxis outfit.
So I'm going to export this one, and open up the alpha file in GIMP. Make a copy of it, and then add a new layer to the dress alpha file, and paste the shirt alpha over it.
Note: This method is particularly useful for dresses or tops in which the fabric beneath the armpit doesn't come all the way up (as it does on a tee shirt rather than a spaghetti strap). It's not completely necessary for this particular dress, but I'll go through the steps anyway.
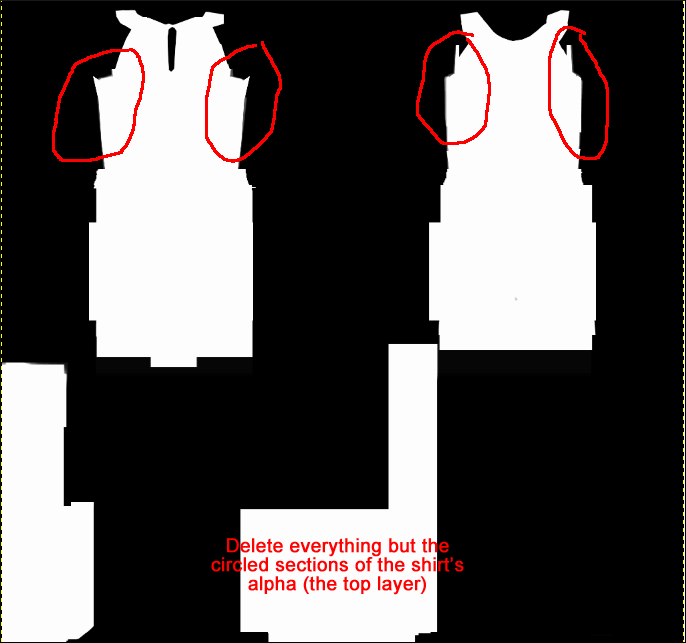
Now, using the Rectangle Select Tool, delete sections of the top layer so that only the sides of the shirt alpha (what is generally in the armpit area) is left, covering up the messy parts of our custom alpha beneath.
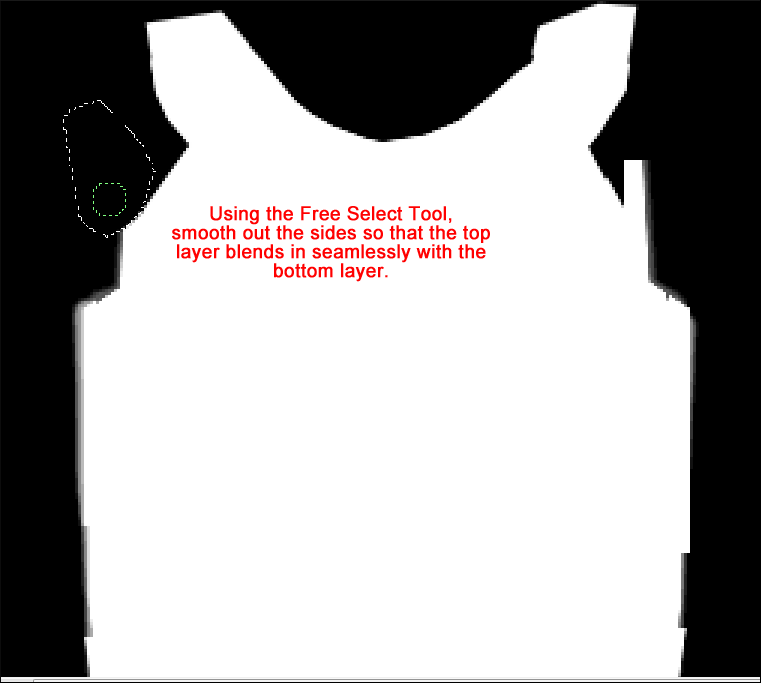
Use the Free Select Tool to connect the lop layer to the bottom layer, adding black and white where necessary.
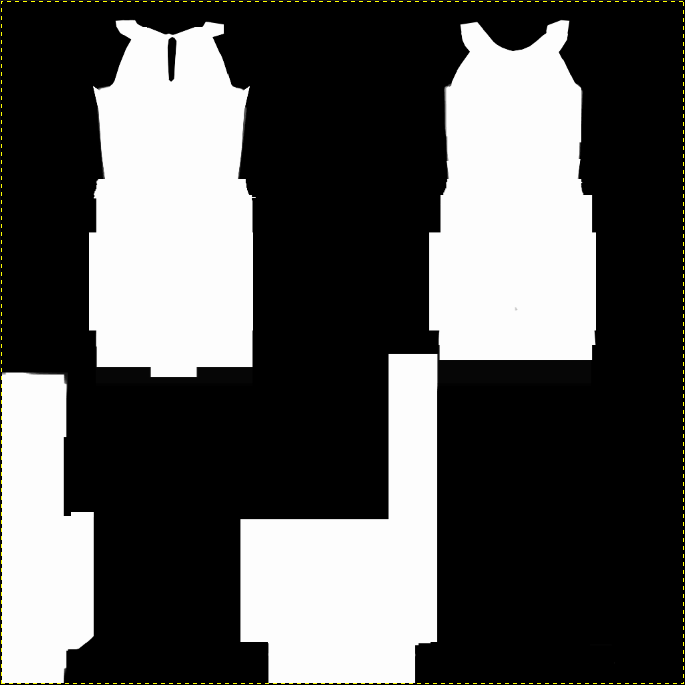
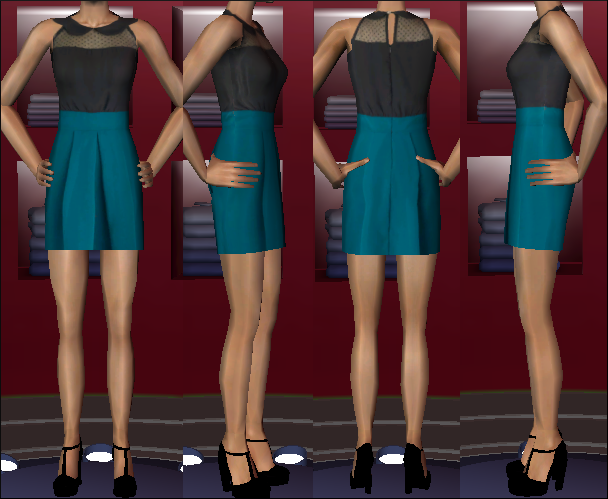
Here's the final product.
Part 9
And now I'm going to show you a little trick to clean up your texture file. This is useful for when your texture file gets messy because you've stretched and/or copy/pasted the textures (you'll noticed, sometimes, that your outfits get very wide), and you'd like to shape the textures according to the alpha.
Image>Flatten Image your alpha, to insure that the image is all on one layer. Now make a copy of the alpha file. Switch over to the texture file. We're nearly finished here, so you can also flatten this canvas (Image>Flatten Image). Then add a new layer, and then paste the alpha image into it. So on the bottom layer you should have your texture, and on the top layer you should have your alpha.
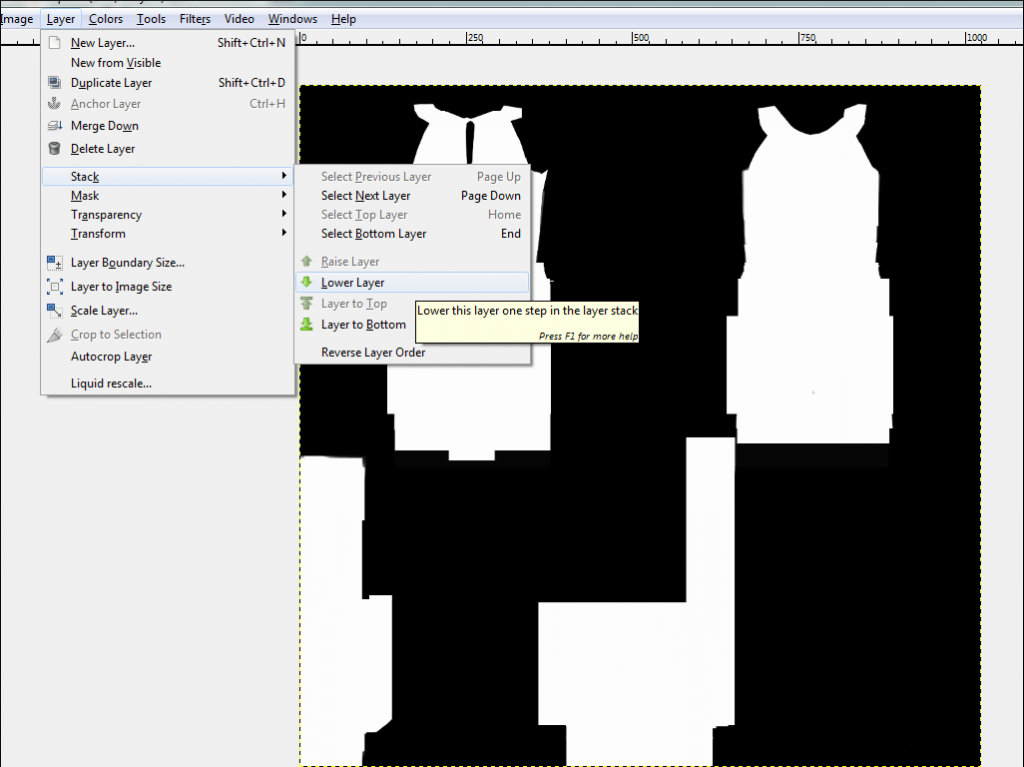
Then go to Layer>Stack>Lower Layer (which will make the texture appear on top), and then Layer>Stack>Select Top Layer.
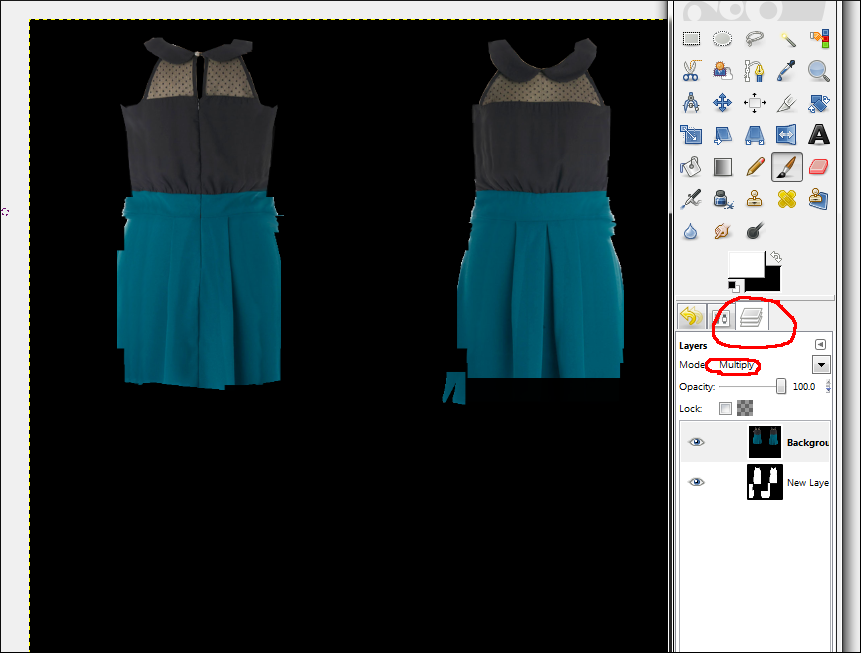
So you should have two layers now. Go to the Layers dialogue in the toolbox (if you don't have one for some reason, it's Ctrl + L) and then change the mode to "Multiple." Tada!
Note: When using this method, I've found that the edges of the outfit sometimes become blackened. To get around this, I extend the edges of the alpha copy (not the actual alpha, but the copy that you pasted over the texture in the last step) just a tiny bit, either by painting on some white with the Paintbrush Tool, or by copy/pasting sections of the dress and moving them over one pixel in each direction.
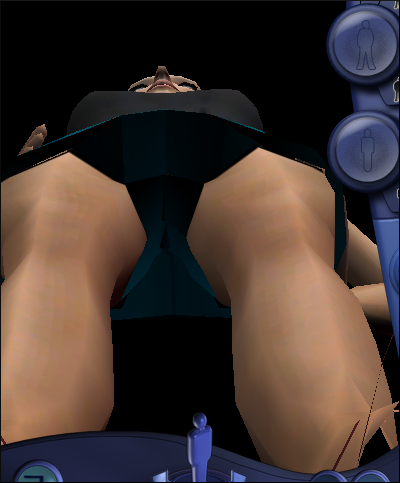
While you've still got those two "multiplied" layers, check the bottom on the dress in Body Shop. Make sure that the textures cover it completely. Sometimes I flood-fill the bottom of my dresses, sometimes I leave the textures there. In this case, the textures look fine, so I'm going to leave them.
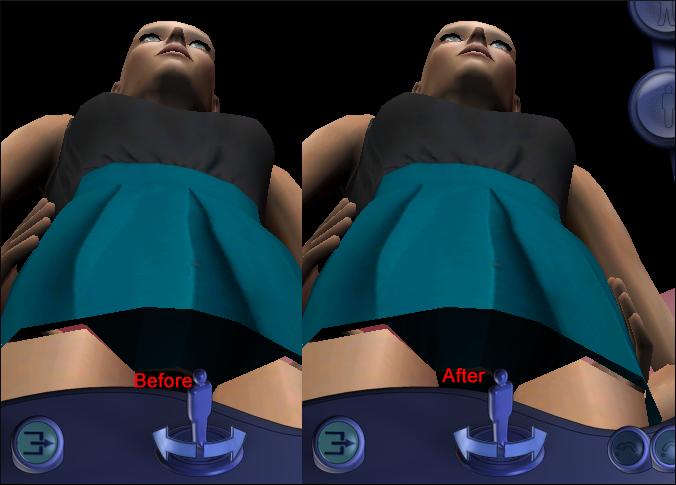
Part 10
So now our texture file and our alpha file are both finished (you'll notice that the shoes are missing—I don't skin shoes, as I find it to be rather difficult, with the way that shoes are mapped. I either use the textures from another creator with an open policy, sometimes re-coloring as I see fit, or I build a texture using various textures from Google images or those that are GIMP-rendered), it's time to deal with that very last file: the bump map (grayscale) file.
If you're graphics card can't handle bump maps, skip this step. Leave the file completely black.
If you're graphics card can handle bump maps, make a copy of the texture file and paste it into the bump map file. This will add 3D-like wrinkles and bumps to your outfit. Sometimes it's very prominent, sometimes it's not at all prominent—the latter is this case with this dress. There's not too, too much of a physical different; it just makes it look slightly more crisp and clean.
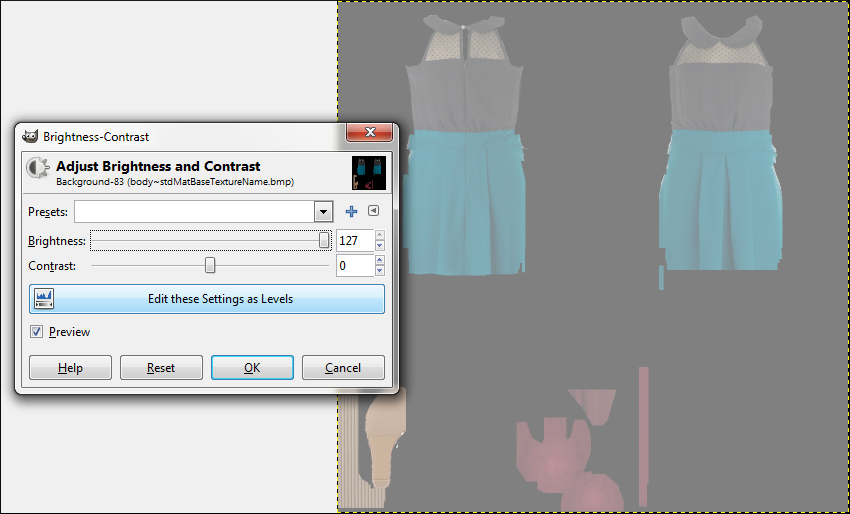
If, however, your bump map is very intense—too intense—you can soften it by upping the brightness. Go to Colors>Brightness/Contrast, and you'll get a pop up from there. Drag the "brightness" bar to the right. Play around with different levels until you're happy with the way that your bump map looks.
This file can be worked with in color. It will automatically be converted to a grayscale when you import your project in Body Shop.
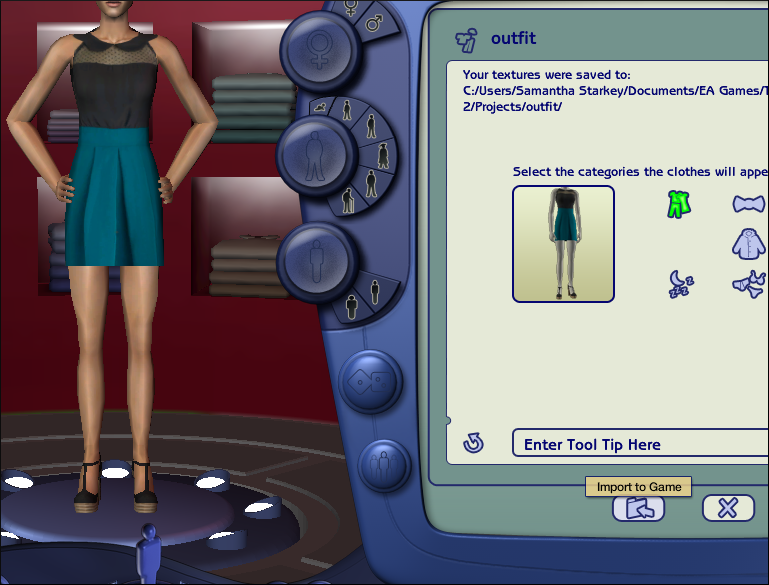
Part 11
We are very close to being finished. Before importing the dress in Body Shop, I'm first going to save a copy of my texture file onto my desktop. The reason for this is that we're going to check our dress in-game (always check in-game before deciding that you're finished—sometimes you'll see things in-game that you just can't see in Body Shop), and if we decide that we need to go back and alter something, we want to work from our copy, because Body Shop distorts textures like crazy. As soon as you import that dress, you're textures will get slightly pixilated and blotchy.
After you've saved a copy, go ahead and import the dress. Quit Body Shop and boot up your game.
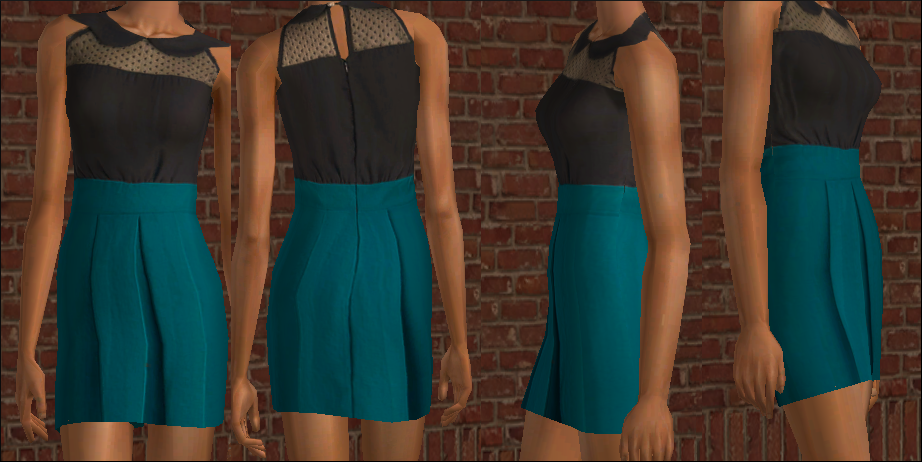
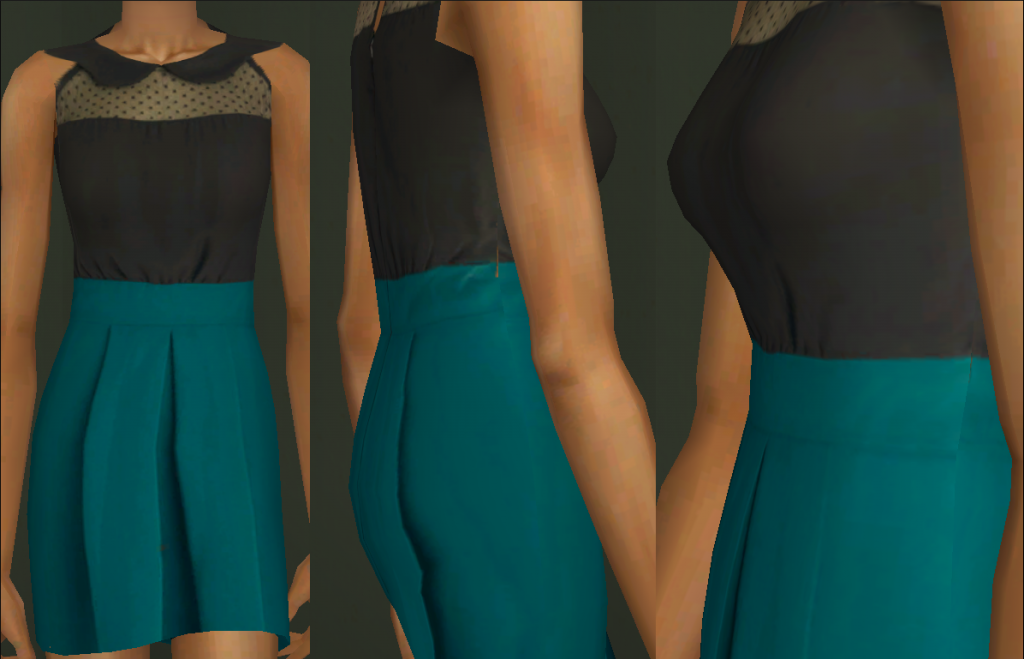
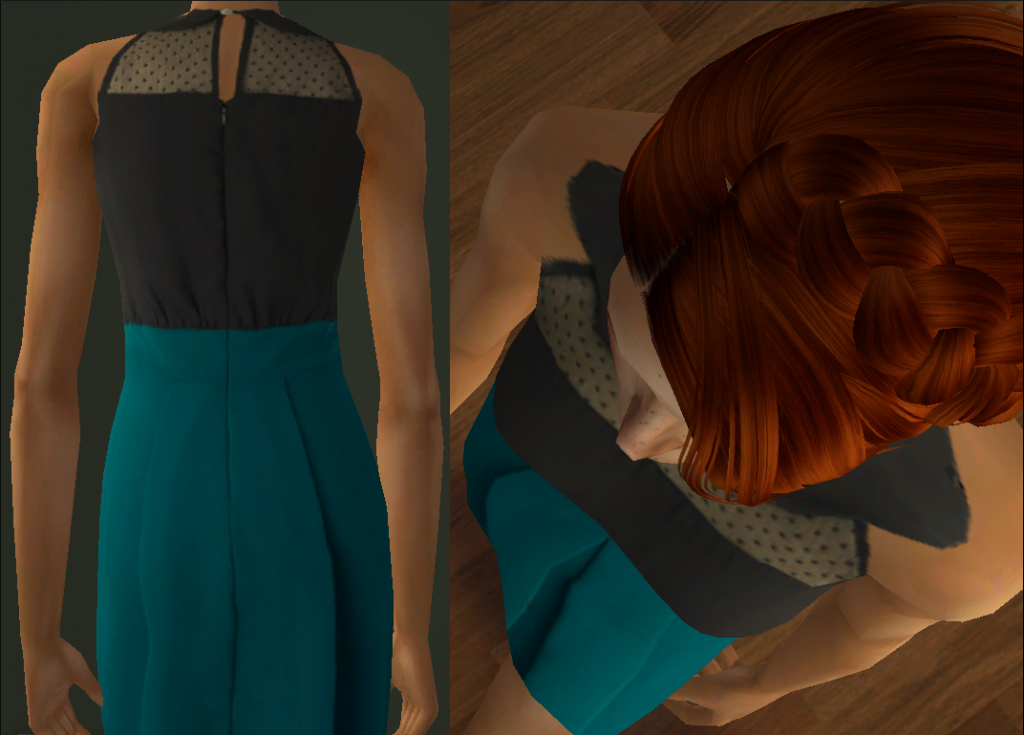
Here's some shots from CAS and in lot (unedited). As you can see, there are some blemishes (like the sides of the dress not meeting perfectly, which means I need to extend the alpha, and the dark spots on the straps of the top), so I'll go once more into Body Shop and fix these up.
Remember: if you do any editing after importing, make sure to paste your saved copy of the textures into the texture file, and then edit those.
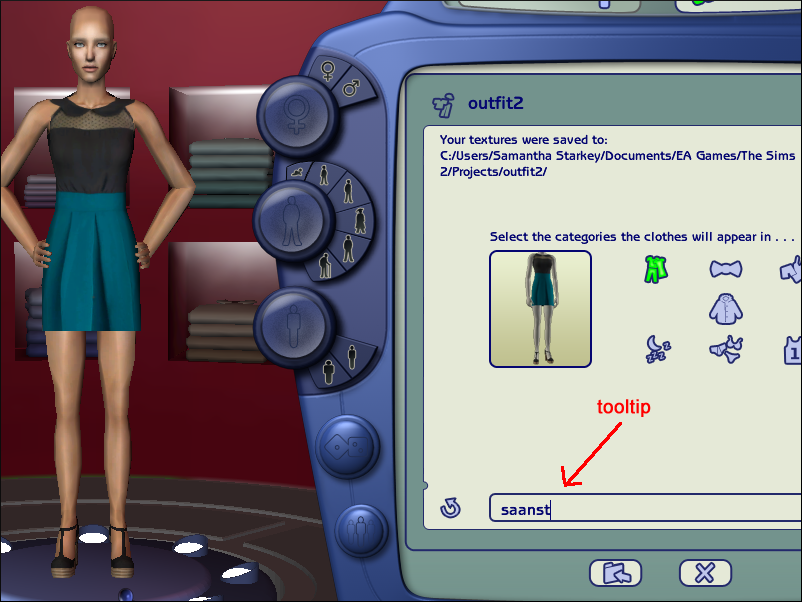
Once you're sure that you're dress looks the way that you intend for it to, you can add your tooltip and import the final product.
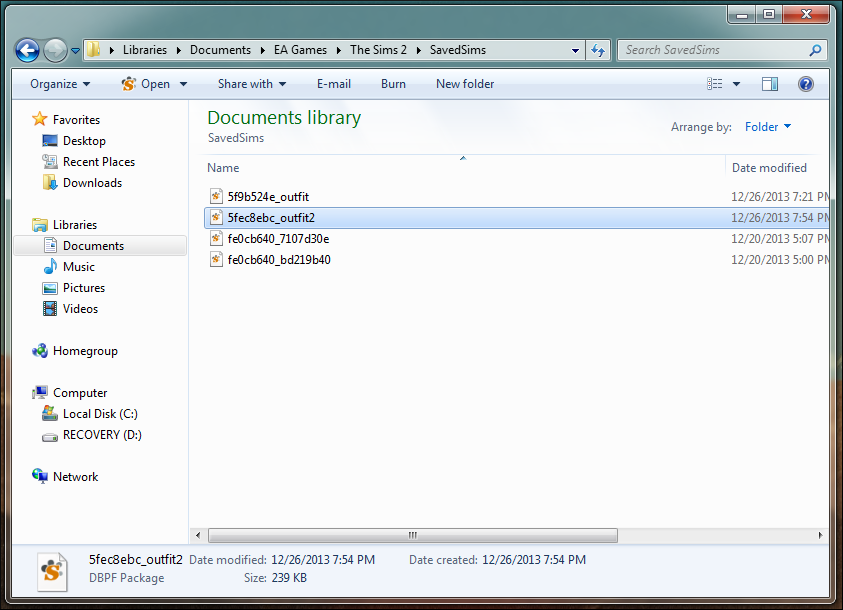
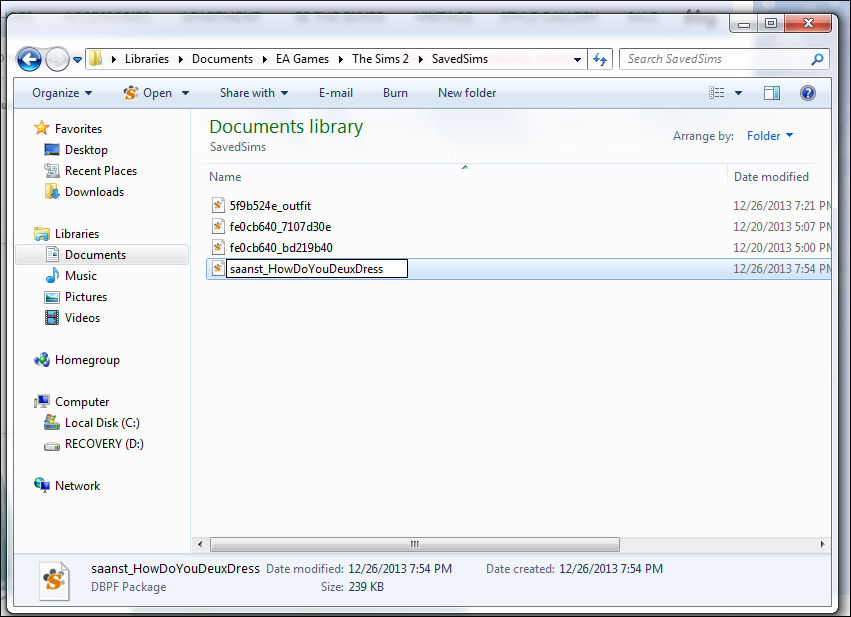
Navigate to your My Documents>EA Games>The Sims 2>Projects folder, and find the file that sports the same name as the project your just exported. Rename it. If you're planning to share it, you should also track down the mesh file in your Downloads folder.
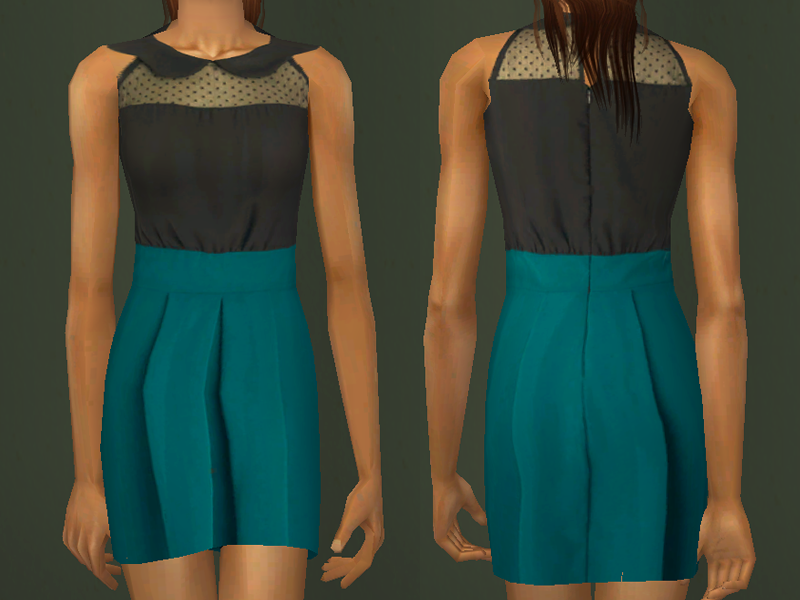
And here we go! Our dress is finished!
Skill level:
You don't need any experience with creating CC or clothing to follow this tutorial; it will be much more in-depth than your typical photo-skinning tutorial, but I will try to explain everything that I'm doing so that beginners can follow along. However, it should be kept in mind that photo-skinning is time-consuming, tedious, and often times very frustrating (or at least to me it is). It takes a bit of practice to do well, and sometimes you'll put hours of work into a piece of clothing only to trash it in the end.
What you need for this tutorial:
• Body Shop & The Sims 2
• GIMP (or your preferred image-editing software, as long as it is capable of handling layers)
• Photoshop (not required but recommended for resizing photos)
• Screen-capture software (I use Fraps)
Normally I use Photoshop for all CC because it's higher-quality than GIMP. GIMP, I've found, distorts images when resizing. However, I prefer GIMP for photo-skinning because I find some of its features more friendly, and it's the image-editing software that I first learned on.

Part 1
The first thing you'll need to do is find a picture of an outfit, front and back. Dresses are probably the easiest to skin; full outfits—with pants—are probably the hardest, because the proportions of the pants will never line up with the proportions of the mesh (the picture will always be too small, which requires stretching and/or copy-paste tiling). For simplicity's sake, we'll make a dress for this tutorial.
You want to use a clothing website that pictures both the front and the back of its clothing. It's easiest to skin an outfit that's not on a person. Mannequins are usually okay. You just want the outfit to be as flat, as straight-forward as possible. I'm going to be using ModCloth, which is one of my favorites.

It's good to keep in mind what you can and cannot do with photo-skinning. You will never be able to create the outfit exactly as it as pictured—oftentimes I manipulate my outfit a lot just to get it to look right in-game; sometimes I cut off parts of a dress, or stick on fabrics from other outfits, etc., etc.
If you've never done this before, I'd suggest avoiding sheer or lacy patterns, as well as any patterns that require intricate cut-outs. The color white is sometimes hard to photo-skin, because it'll appear washed-out in-game. I like patterns and folds because they translate well; solid colors and smooth fabrics, on the other hands, can sometimes look flat and flood-filled.
Sleeves are also tricky to do sometimes. I never use the sleeves from the actual picture, but usually piece them together or color them by hand. If you're just starting out, I'd suggest going with an outfit that is sleeveless or strapless.

So I've selected this dress, and now I'll open up my screen-capture software (Fraps, in my case). I want the picture that I'm going to be skinning from to be as large as possible. So you know how clothing websites have a magnifying glass that lets you zoom in on the outfit? You want to take screen caps of these magnified sections of the dress—which, yes, will result in you having a bunch of disjointed sections of the dress, which we will piece together.
I've never found a website where the picture of the full dress (pictured above on the right) has been large enough. It's steps like these—like piecing together your picture—that I mean when I say that photo-skinning is tedious and time-consuming.

Take enough caps of both the front and the back of the dress that you know you have the whole thing—some overlap between the pictures is good. Usually I do three caps for the front, three for the back.
Next I'll open up Photoshop and paste the sections together.

Open up the first screen cap of the front of the dress. Select the area of the top of the dress that we're going to be working with, cut it, then color the canvas a solid color (I've done black) and rotate the entire canvas 90 degrees. Now paste what we've cut at the top of the canvas.

Open up the second screen cap of the front of the dress. Select the area of the midsection of the dress, cut it, and then paste it onto the other canvas with the top of the dress. Line up the two sections so that they meet perfectly. It's helpful to zoom in really close.

Repeat for the third section of the dress. Repeat for the back of the dress.
In the end you should have two photos: one of the front of the dress and one of the back, both of which are large enough to work with. You can crop them close and delete the rest of the screen caps.


Part 2
Now it's time to open up Body Shop. Once it loads, go to Create Parts>Start New Project >Create Clothing. We're going to look for a mesh now to put this photo on. I'm going to try to select one that is as close to the shape of the dress in the picture as possible.
Try to avoid alpha-editable skirts, if you can. An alpha-editable skirt is basically an overlay that goes on a mesh, so that a skirt can be shorted or extended using an image-editing program, without having to alter the mesh itself. If you choose a mesh with an alpha-editable skirt (you'll know because, if you rotate the screen down in Body Shop, you'll see that the dress is open on the bottom, not solid; also when you open up your image-editing program, there will be a separate file for the skirt), you'll have to skin the outfit in two parts, rather than in one. And most of the time the two parts don't match up perfectly, so you'll have to play around with it a lot to get it to look right.


The shape of dress that I'm skinning for this tutorial is rather simple, so I'm going to go with a simple, short, body-hugging mesh. Click "Export Selected Textures," and then you'll be prompted to give your project a name. If you have a lot of projects in your projects folder (Documents >EA Games >The Sims 2>Projects), it's a good idea to give it a distinguishing name. My projects folder is empty, so I've simply named mine "outfit."

Once you've exported your project in Body Shop, you can now open up GIMP. File>Open your project by navigating to the aforementioned "Projects" folder (Documents>EA Games>The Sims 2>Projects) and clicking on the subfolder with your project name (e.g. "outfit").
Your project subfolder should have three files within it. Some meshes, like ones with alpha-editable skirts, will have more than three files. The files are always in the same order: texture, alpha, bump map. The texture file is the file that you will be putting the picture from ModCloth onto. The alpha is a black-and-white image that basically adds "cloth" to your design—that is, anything this is white is an area on the Body Shop mannequin that clothing will appear on. The bump map file is a grayscale file that adds a 3D imprint onto your outfit, to match the bumps and wrinkles of the dress. Depending on whether or not your graphics card supports bump maps, you may or may not be able to see bump maps (my old computer, for example, didn't have a graphics card which supported bump maps, so for the longest time, I thought this grayscale file was completely useless).
If you think that your graphics card can support bump maps, yet they aren't showing up in Body Shop or in-game, then there's a tutorial here on how to turn bump maps on:
simswiki.info/wiki.php?title=Game_Help:Bump_Maps_and_Shaders


First and foremost, we're doing to do some prep work. Open up the bump map file (the third file, the grayscale one), and if there's an image there, delete it: make the entire canvas black. Save and close the file.

Then open up the alpha file (the second file, the black-and-white one) and make a copy of it. Close the file and open up the texture file (the first file). Now paste the copy of the alpha into the texture file and save.
Go back into Body Shop and refresh. Your outfit should be completely white now, as picture above.

Part 3
Now we'll actually begin photo-skinning. But when you paste the picture of the dress into the texture file as-is, you'll see that it's too big. So we're going to resize. With the texture file open in GIMP, open up the two pictures of the dress—the front and the back—in Photoshop.
It's always better to make a larger photo smaller than it is to make a smaller photo larger.

It takes a bit of guesswork to resize the dress perfectly. The dimensions of the front of the dress are currently 612 x 1132 px. I'll try setting the width at 400 (the height should automatically adjust proportionally, to 740 in this case), and copy the resized image from Photoshop to our canvas in GIMP.

But 400 x 740 is still too big, as you can see when you align the dress on the canvas, save, and refresh in Body Shop.
A note for those of you who have never worked with clothing in Body Shop: the front of the dress is always on the right side of the canvas, while the back of the dress is on the left.

So back in Photoshop, I'm am going to undo all of the history (basically reset the image, so that we're not resizing what we've already resized, in case that causes distortion—this is very important to do if you don't have Photoshop and you're resizing in GIMP, because GIMP does distort images). Now I'm going to change the width to 325 px.

It looks pretty good.
So once you're done with all of the guesswork and you have your resized picture of the front of the dress, you now want to also resize the back of the dress. Since the original files were not exactly the same size (because I auto-cropped them), you can just eyeball it. I did 325 px for the front of the dress and 335 px for the back of the dress.

Back in GIMP, undo all of your changes until you are back to the black-and-white alpha only—that is, get rid of the image of the dress. Make sure everything is merged down so that you only have one layer (Image > Flatten Image).

Now add a layer to the canvas (Layer > New Layer). By default, the settings for a new layer should be as shown above.
Press "OK."
You should now have two layers on your canvas. It is important now not to close this project, because GIMP cannot save layers. If you close your project, it will all be saved as one merged layer.

Now take your resized images from Photoshop and paste them into GIMP, aligning them with the generally anatomy of the alpha. You don't have to worry about getting them exactly aligned right now.
You can also close Photoshop at this point. IMPORTANT: Do not saved the resized pictures of the dress. Undo all of the history for each of the images and save them as their original, larger size. This way, if we mess up or need to use a larger picture somewhere down the line, we don't have to pull them from the website again.

Now, in GIMP, click on the Fuzzy Select Tool and then click on the white space around the front of the dress. Hit delete, making sure first that none of the actual dress is caught in the wand. Do the same for the back of the dress.


Next, go to Layer>Stack>Select Next Layer, and with black as your background color, hit delete. This will get rid of the bottom layer so that only the dress remains. We needed the white alpha only to align the dress to the canvas in the general area.

Go back to the top layer by going to Layer>Stack>Select Previous Layer.
Next, using the Free Select Tool, zoom in really close to the dress and begin to cut away at extraneous parts of the photograph—the mannequin, for example. We want to clean up the photo so that only the dress is remaining.

Clean it up the best you can. As you can see, I also cut away some of the sheer fabric from the skirt of the dress.

Part 4
Now make a copy of the layer. Without closing this file (I repeat: do NOT close it), go to File>Open, and open up the alpha file (the black-and-white one). Select the very top of the dress and delete it.

You should only have one layer on your canvas at this point. Add another one by going to Layer>New Layer. Now paste the texture on top of the alpha.
Select the bottom of the dress—up until just under what you deleted of the black and white—and hit delete. The top of your dress should now be textured and the bottom should be white.

Do a Ctrl + A (to select the layer), a Ctrl + X (to cut it), and a Ctrl + V (to paste it). This will select just the very top layer, the textured part. Now click on the paintbrush tool, and with the foreground color set to white, color in the textured parts. By selected the layers, you won't be able to color outside of the dotted lines.
Flatten the image (Layer>Flatten Image) and save.

Congratulations! You've just made a custom alpha.
But don't get too comfortable, because this is hardly the final product. This is just a temporary one to gauge how well we've lined up the texture with the actual mesh. Remember how I said photo-skinning is tedious? We'll probably do this a couple of times over.

Part 5
Save both the texture and the alpha file, then refresh in Body Shop. NOTE: Now that we're working with layers, you might get a notice in GIMP when you save asking about exporting the file because the program can't handle layers. "Merge Visible Layers" will be checked by default. Hit "Export." This doesn't really matter as long as you don't close the image and lose all of your history.
Study the outfit in Body Shop. Now is the time to examine the alignment of the texture on the mesh, and whether or not the texture should be moved up, down, left, or right—maybe even resized a little.
You'll notice that the dress does not meet at the sides, and that there's a lot of black space. That's fine for now. If your dress does meet, you probably didn't resize the original images to be small enough, and the dress' proportions will be slightly off (the torso, for example, will probably be too long). Never have I skinned a dress in which the sides have met perfectly without the need for manipulation.
Well, studying this dress now in Body Shop, it looks to me like it could be shifted upwards a bit.

So back in GIMP, I'm going to do another Ctrl + A, Ctrl + X, Ctrl + V, and then with the "Rectangle Select Tool" selected, I'm going to use the arrows on the keyboard to nudge the dress up a little. I'm going to click the up arrow four times.

And also, because I'd like the skirt a little longer and the torso a bit shorter, I'm going to do some resizing.
I'm going to select a portion of the dress, starting somewhere around the middle of the bust and stopping at a pretty solid-looking area of the skirt. Now I'm going to copy and paste this section once, and then click on the Scale Tool, and then drag the top upwards a bit.
Once you are happy with the proportions of the dress and the way that it is sitting on the mesh, you should redo the alpha again by following Part 4. Don't skip this step.

Because of the resizing/scaling I did in the last step, you'll notice that—when I zoom in—some of the textures don't line up.

Using the Smudge Tool (which you can see I've set to a scale of .40), I'm going to carefully blend the textures together so that they look seamless. Do this for both the front and the back of the dress, wherever the textures are unaligned.


Looks pretty good.
Don't forget to do the front of the dress!

Part 5 1/2 - A Step I Accidentally Forgot About
I should have mentioned this much sooner:
Some websites, ModCloth included, side-light their clothing. So a light is placed on the right side of the outfit, making the right-hand side of the fabric brighter and the left-hand side slightly darker. But when you match the front of the dress up with the back of the dress in Body Shop, the opposite-lighted ends meet.

There's a very simple fix for this:
Using the Rectangle Select Tool, select the entirety of the back of the dress—as close to the edges as possible—then click on the Flip Tool (make sure it's checked to "horizontal") and click on the canvas to flip the section.
Save and refresh in Body Shop. Make any adjustments or movements needed to realign the back of the dress and then, unfortunately, you're going to have to redo the alpha again (Sorry! I meant to mention this earlier but forgot to do so—flipping the back of the dress is something that you can do as soon as you copy the image from Photoshop into GIMP).

Part 6
So now we need to make the sides of the dress meet.
Before starting, switch over to the alpha and fill out the sides of the top of the dress with white, to ensure that the area is covering with "cloth." Don't worry about making it neat; we'll fix it up later.

Using the Free Select Tool, start on the left side of the front of the dress and draw a selection starting from the armpit down to the skirt. Try to go through solid areas rather than cutting across any wrinkles or patterns. Connect your selection, then copy and paste it once.

Move the copy to the left, thereby extending the side of the dress. Try to match it up as perfectly as possible. It will, of course, be a little off, but we'll fix that up later. Save and switch over to Body Shop to check your work.

As you can see, the dress is almost but not quite all the way to the edge. The only parts that need to be extended a bit more are those right at the smallest part of the waist and right up beneath the armpit.
(If you still had a lot of ways to go, you could either do another copy and paste, or you could use the Scale Tool and stretch out the previous copy. Remember to treat any scaling or resizing that you do very delicately—you don't want to scale anything too large for fear of pixilating the textures.)

I'm going to use the Scale Tool for the waist, and I'll just do a little patchwork by hand for the armpit (because the area's so small).

Perfect!

Now, using the Smudge Tool, I'm going to blend together the areas where I pasted the sections over each other.

Once you're happy with the blending, repeat this process for the other three sides of the dress, so that all of the edges meet at the waist. It's helpful to save and refresh in Body Shop often. You'll do a lot of smudging and blending, and probably even some manipulation of the textures—for example, in order to get the sash on the back of the dress to match up with the sash on the front of the dress, I rotated parts of the texture and, at one point, even moved the entire top of the back of the dress up a few pixels (which, of course, required that I redo the alpha).

Here's how it looks in Body Shop.
It's looking close to done, but there's still a lot that we have to do. For example—

Part 7
The top of the dress still doesn't meet.

We're going to work with the alpha again, but because it is still pretty messy from the beginning of Part 6, I'm going to use my texture file to make a new alpha (Part 4). The sides of the dress won't meet when you do this, but that's okay for now. We're going to fix the straps of the dress and clean up the sides.

We have to extend the straps, because they're too short right now. Using the Free Select Tool, extend the strap on the front of the dress upwards. There's no hard-and-fast way of going about this; depending on the thickness and the direction of the strap, you'll have to play around, refreshing often in Body Shop.

It should look something like this in Body Shop. The solid black is the "cloth" that you just added in the alpha file.

Now make a copy of the entire alpha. Add a new layer, and paste it. Then use the Flip Tool and horizontally flip your new layer.

Now delete everything on your new layer except for the straps of the dress in the upper left-hand corner of the canvas. What we're doing now is trying to match the straps on the back of the dress with the straps on the front of the dress, so they connect perfectly. By mirroring the front of the dress onto the back of the dress, we can take some of the guesswork out of this endeavor.

Connect the two sets of straps.

Save and refresh in Body Shop.
You can see that straps now connect, but that they might be a bit imperfect or slightly off in spots. Continue to play around with the alpha a bit. Get it to match as close as possible—until you're happy—and then switch back to the texture file.

Extend the straps of the front of the dress by using the copy-and-paste method like we used for the sides. I also rotated mine slightly, and then used the Smudge Tool to blend the textures together.
Repeat for the back of the dress.

Here's how it looks in Body Shop.
The alpha is still slightly off, so I'm going to tweak it once more, and...

There we go!
Now we're going to work on the sides of the dress. For this, I usually cheat a little.

Part 8
For the sides of my dress, I usually steal an alpha off of a Maxis outfit.
So I'm going to export this one, and open up the alpha file in GIMP. Make a copy of it, and then add a new layer to the dress alpha file, and paste the shirt alpha over it.
Note: This method is particularly useful for dresses or tops in which the fabric beneath the armpit doesn't come all the way up (as it does on a tee shirt rather than a spaghetti strap). It's not completely necessary for this particular dress, but I'll go through the steps anyway.

Now, using the Rectangle Select Tool, delete sections of the top layer so that only the sides of the shirt alpha (what is generally in the armpit area) is left, covering up the messy parts of our custom alpha beneath.

Use the Free Select Tool to connect the lop layer to the bottom layer, adding black and white where necessary.


Here's the final product.

Part 9
And now I'm going to show you a little trick to clean up your texture file. This is useful for when your texture file gets messy because you've stretched and/or copy/pasted the textures (you'll noticed, sometimes, that your outfits get very wide), and you'd like to shape the textures according to the alpha.
Image>Flatten Image your alpha, to insure that the image is all on one layer. Now make a copy of the alpha file. Switch over to the texture file. We're nearly finished here, so you can also flatten this canvas (Image>Flatten Image). Then add a new layer, and then paste the alpha image into it. So on the bottom layer you should have your texture, and on the top layer you should have your alpha.
Then go to Layer>Stack>Lower Layer (which will make the texture appear on top), and then Layer>Stack>Select Top Layer.

So you should have two layers now. Go to the Layers dialogue in the toolbox (if you don't have one for some reason, it's Ctrl + L) and then change the mode to "Multiple." Tada!
Note: When using this method, I've found that the edges of the outfit sometimes become blackened. To get around this, I extend the edges of the alpha copy (not the actual alpha, but the copy that you pasted over the texture in the last step) just a tiny bit, either by painting on some white with the Paintbrush Tool, or by copy/pasting sections of the dress and moving them over one pixel in each direction.

While you've still got those two "multiplied" layers, check the bottom on the dress in Body Shop. Make sure that the textures cover it completely. Sometimes I flood-fill the bottom of my dresses, sometimes I leave the textures there. In this case, the textures look fine, so I'm going to leave them.

Part 10
So now our texture file and our alpha file are both finished (you'll notice that the shoes are missing—I don't skin shoes, as I find it to be rather difficult, with the way that shoes are mapped. I either use the textures from another creator with an open policy, sometimes re-coloring as I see fit, or I build a texture using various textures from Google images or those that are GIMP-rendered), it's time to deal with that very last file: the bump map (grayscale) file.
If you're graphics card can't handle bump maps, skip this step. Leave the file completely black.
If you're graphics card can handle bump maps, make a copy of the texture file and paste it into the bump map file. This will add 3D-like wrinkles and bumps to your outfit. Sometimes it's very prominent, sometimes it's not at all prominent—the latter is this case with this dress. There's not too, too much of a physical different; it just makes it look slightly more crisp and clean.

If, however, your bump map is very intense—too intense—you can soften it by upping the brightness. Go to Colors>Brightness/Contrast, and you'll get a pop up from there. Drag the "brightness" bar to the right. Play around with different levels until you're happy with the way that your bump map looks.
This file can be worked with in color. It will automatically be converted to a grayscale when you import your project in Body Shop.

Part 11
We are very close to being finished. Before importing the dress in Body Shop, I'm first going to save a copy of my texture file onto my desktop. The reason for this is that we're going to check our dress in-game (always check in-game before deciding that you're finished—sometimes you'll see things in-game that you just can't see in Body Shop), and if we decide that we need to go back and alter something, we want to work from our copy, because Body Shop distorts textures like crazy. As soon as you import that dress, you're textures will get slightly pixilated and blotchy.
After you've saved a copy, go ahead and import the dress. Quit Body Shop and boot up your game.


Here's some shots from CAS and in lot (unedited). As you can see, there are some blemishes (like the sides of the dress not meeting perfectly, which means I need to extend the alpha, and the dark spots on the straps of the top), so I'll go once more into Body Shop and fix these up.
Remember: if you do any editing after importing, make sure to paste your saved copy of the textures into the texture file, and then edit those.

Once you're sure that you're dress looks the way that you intend for it to, you can add your tooltip and import the final product.


Navigate to your My Documents>EA Games>The Sims 2>Projects folder, and find the file that sports the same name as the project your just exported. Rename it. If you're planning to share it, you should also track down the mesh file in your Downloads folder.

And here we go! Our dress is finished!


 The Sims 2 & 3 Gameplay